1. Nhanganyaya
Thank you for choosing the MXR M293 Booster Mini Guitar Effects Pedal. This compact and powerful pedal combines the sought-after sonic characteristics of the Echoplex Preamp with the robust boosting capabilities of the MXR Micro Amp. Designed for guitarists seeking to enhance their tone, add grit, and achieve significant volume boosts, the Booster Mini is an essential addition to any pedalboard.
This manual provides detailed instructions for setting up, operating, and maintaining your MXR M293 Booster Mini pedal, along with information on the included accessories.
2. Zvigadzirwa zveChigadzirwa
- Combines the sonic characteristics of the Echoplex Preamp with the boosting power of the MXR Micro Amp.
- Compact, pedalboard-friendly mini housing.
- Volume control provides up to +25dB of clean boost.
- Tone control allows for high-frequency roll-off, shaping your boosted signal.
- Internal Echoplex Preamp level control for adding subtle to significant grit to your signal.
3. Package Zviri mukati
Your MXR M293 Booster Mini Guitar Effects Pedal bundle includes:
- 1 x MXR M293 Booster Mini Guitar Effects Pedal
- 2 x 6-inch Right Angle Patch Cables
- 1 x Dunlop Pick Pack (assorted gauges and materials)

Image: The complete MXR M293 Booster Mini bundle, showing the pedal, two right-angle patch cables, and a selection of Dunlop guitar picks.

Mufananidzo: Kuvhara view of the assorted Dunlop guitar picks included in the bundle, showcasing various gauges and materials.

Image: One of the included 6-inch right-angle patch cables, designed for efficient pedalboard connections.
4. Kudzora uye Kubatana
The MXR M293 Booster Mini features a straightforward control layout for ease of use.

Mufananidzo: Pamusoro-pasi view of the MXR M293 Booster Mini pedal, highlighting the Volume and Tone control knobs and the footswitch.
- VOLUME Knob: Controls the overall output level of the pedal. Turn clockwise to increase the boost, up to +25dB.
- TONE Knob: Adjusts the high-frequency content of the boosted signal. Turn clockwise for a brighter tone, counter-clockwise to roll off highs.
- Footswitch: Inobata kana kuti inonzvenga mhedzisiro yacho.
- Inzwa Zvinotaurwa Jack: Connect your guitar or the output of another pedal here.
- Kubuda Jack: Batanidza kune yako amplifier or the input of the next pedal in your signal chain.
- Power Input (9V DC): Connect a standard 9-volt DC power adapter (center-negative) here. The pedal operates at 9 Volts and 9 Milliamps.
- Internal Echoplex Preamp Level Control: Located inside the pedal, this trim pot allows for fine-tuning the amount of grit or saturation added to your signal. Adjust with a small screwdriver.
5. Setup
Follow these steps to integrate the MXR M293 Booster Mini into your guitar rig:
- Power Connection: Connect a 9-volt DC power adapter (center-negative) to the pedal's power input. Ensure the power supply meets the 9 Volts and 9 Milliamps requirement.
- Signal Chain:
- Connect your guitar (or the output of a preceding pedal) to the Booster Mini's Input Jack.
- Connect the Booster Mini's Kuburitsa Jack kwauri amplifier (or the input of a subsequent pedal). Use the included patch cables for connecting to other pedals on your board.
- Pakutanga Zvirongwa: Start with the VOLUME knob at a low setting (e.g., 9 o'clock) and the TONE knob at noon.
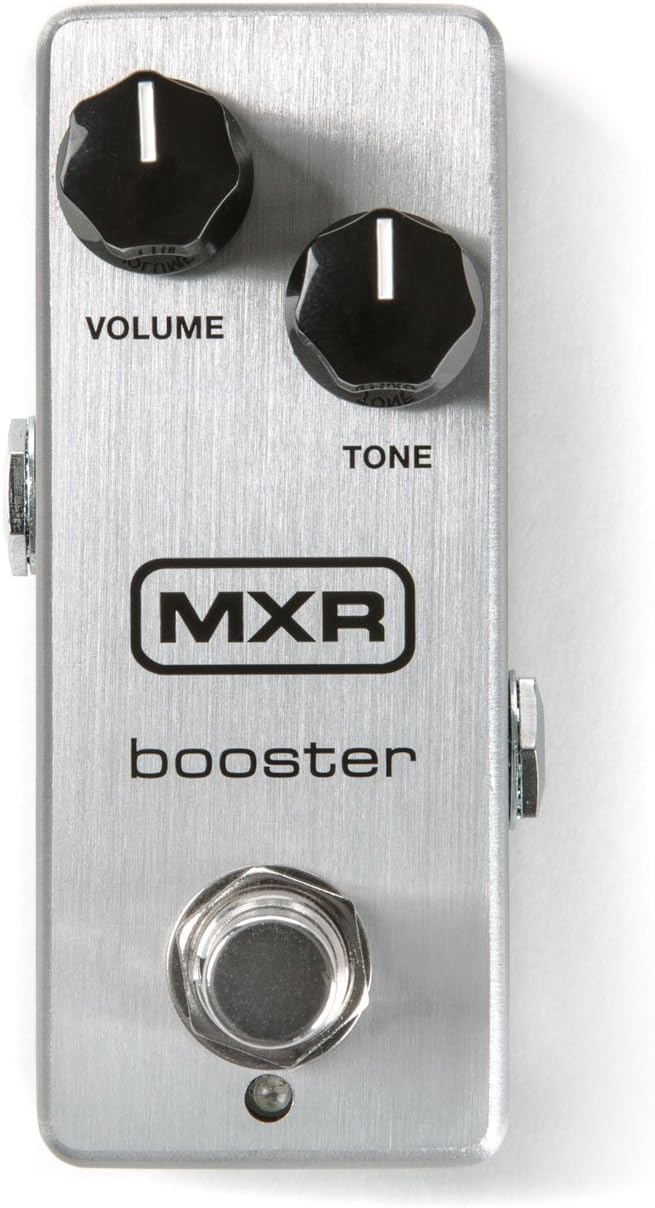
Image: The MXR M293 Booster Mini pedal shown alongside a compatible 9V DC power adapter, illustrating the power connection.
6. Operating Instructions
Once connected, you can begin using your MXR M293 Booster Mini:
- Kuita Mhedzisiro: Press the footswitch to engage the Booster Mini. The LED indicator will illuminate when the effect is active. Press again to bypass the effect.
- Kugadzirisa Inzwi: Slowly turn the VOLUME knob clockwise to increase the boost level. Be mindful of your amplifier's volume to avoid sudden loud sounds. This control provides a clean boost, perfect for pushing your amp into overdrive or for solos.
- Shaping Tone: Use the TONE knob to fine-tune the high-end response. Turn it clockwise for a brighter, more present sound, or counter-clockwise to smooth out harsh frequencies or achieve a warmer tone.
- Adding Grit (Internal Control): For a subtle to pronounced overdriven character, adjust the internal Echoplex Preamp level control. This requires opening the pedal. Use a small screwdriver to carefully turn the trim pot. Experiment to find your desired level of saturation.
- Kuiswa muChiratidzo Chechiratidzo:
- Before Overdrive/Distortion: Placing the Booster Mini before gain pedals will increase the input signal to those pedals, resulting in more saturation and sustain.
- After Overdrive/Distortion: Placing it after gain pedals will increase the overall volume of your distorted sound without adding more distortion, ideal for solo boosts.
7. Kuchengeta
Proper care will ensure the longevity and optimal performance of your MXR M293 Booster Mini:
- Kuchenesa: Pukuta pedal nejira rakapfava, rakaoma. Usashandise zvinochenesa zvinogumbura kana zvinonyungudutsa.
- Kuchengeta: Chengeta pedal munzvimbo yakaoma, kure nekupisa kwakanyanya uye hunyoro.
- Simba: Always use a regulated 9V DC center-negative power supply. Disconnect power when not in use for extended periods.
- Connections: Periodically check all cable connections for wear and tear. Ensure jacks are clean and free of debris.
8. Kugadzirisa matambudziko
| Dambudziko | Zvinogona Kukonzera | Solution |
|---|---|---|
| Hapana ruzha kana pedal yakabatidzwa. |
|
|
| Ruzha rusingadiwe kana kuti ruzha. |
|
|
| LED not illuminating. |
|
|
9. Zvinotsanangurwa
| Attribute | Detail |
|---|---|
| Model | M293 |
| Brand | MXR |
| Item Weight | 1.01 pounds (approx. 0.46 kg) |
| Package Dimensions | 11.61 x 2.99 x 2.83 inches (approx. 29.5 x 7.6 x 7.2 cm) |
| Signal Format | Analogi |
| Voltage Zvinodiwa | 9 Volts DC (pakati-negative) |
| Amphasha Dhirowa | 9 mamiriyoniamps |
| Color | Dema, Sirivha |
10. Safety Information
Ndokumbira uverenge uye utevedzere zvinotevera mirairo yekuchengetedza:
- Do not expose the pedal to water or excessive moisture.
- Avoid operating the pedal in direct sunlight or near heat sources.
- Use only the specified power supply (9V DC, center-negative). Using an incorrect power supply can damage the unit and void your warranty.
- Do not attempt to open or service the unit beyond adjusting the internal trim pot. Refer all servicing to qualified personnel.
- Chengetedza pasingasvikirwi nevana.
11. Warranty uye Tsigiro
MXR products are known for their quality and reliability. For warranty information, technical support, or service inquiries, please visit the official MXR websaiti kana kubata dhipatimendi ravo rebasa revatengi. Chengetedza risiti yako yekutenga sehumbowo hwekutenga kwezvichemo zvewaranti.
Official MXR Websaiti: www.jimdunlop.com/mxr/