1. Nhanganyaya
This manual provides detailed instructions for the setup, operation, and maintenance of your Peavey PV 14 AT 14 Channel Compact Mixer. The PV 14 AT is designed for professional audio applications, featuring 14 channels, integrated Bluetooth connectivity, and Antares Auto-Tune pitch correction technology. Please read this manual thoroughly to ensure proper use and to maximize the performance and longevity of your mixer.
2. Yakakosha Mirayiridzo Yekuchengetedza
- Kunobva Simba: Connect the unit only to the type of power supply specified in this manual or on the unit.
- Unyoro uye Zvinwiwa: To reduce the risk of fire or electric shock, do not expose this apparatus to rain or moisture. Do not place objects filled with liquids, such as vases, on the apparatus.
- Kufefetedza Iva nechokwadi chekuti mhepo inofema zvakanaka. Usavhare chero nzvimbo dzinofema. Isa zvinoenderana nemirairo yemugadziri.
- Kupisa: Usaise padhuze nechero zvitubu zvekupisa zvakaita semaradiator, marejita ekupisa, zvitofu, kana zvimwe midziyo (kusanganisira amplifiers) zvinoburitsa kupisa.
- Grounding: Usakunda chinangwa chekuchengetedza chepolarized kana grounding-type plug. Polarized plug ine mablades maviri ane rimwe rakakura kupfuura rimwe. Ipuragi yemhando yepasi ine mablades maviri uye yechitatu yekugadzika prong. Iyo yakafara blade kana yechitatu prong inopihwa kuchengetedza kwako. Kana iyo plug yakapihwa isingakwane mudura rako, bvunza nyanzvi yemagetsi kuti inotsiva iyo yasakara kubuda.
- Power Cord Protection: Chengetedza tambo yemagetsi kubva pakufambiswa kana kudzvanywa, kunyanya pamapulagi, midziyo yekurerutsira, nenzvimbo yavanobuda kubva mumidziyo.
- Sevhisi: Tumira masevhisi ese kuvashandi vanokwanisa. Kushumira kunodiwa kana mudziyo wakuvadzwa neimwe nzira, senge tambo yemagetsi-yekugovera kana plug yakuvadzwa, mvura yadeuka kana zvinhu zvawira mumidziyo, iyo midziyo yave ichinaya mvura kana hunyoro, haishande zvakajairika. , kana kuti yadonha.
3. Chigadzirwa Pamusoroview uye Features
3.1 Front Panel Controls
The front panel of the PV 14 AT mixer provides access to all channel inputs, equalization controls, effects, and master output faders. Each channel features dedicated gain, EQ, and auxiliary send controls for precise audio shaping.

Mufananidzo: Angled view of the Peavey PV 14 AT mixer's front panel, showing various knobs, faders, and input jacks.
3.2 Rear Panel Connections
The rear panel houses essential power and digital audio connections, including the DC power input, power switch, and the Digital Audio Port for USB connectivity to a computer. Bluetooth pairing information is also located here.

Mufananidzo: Rear view of the Peavey PV 14 AT mixer, displaying the DC power input, power switch, Digital Audio Port (USB), and Bluetooth pairing information.
3.3 Dimensions
The compact design of the PV 14 AT makes it suitable for various setups. Refer to the image below for approximate dimensions.
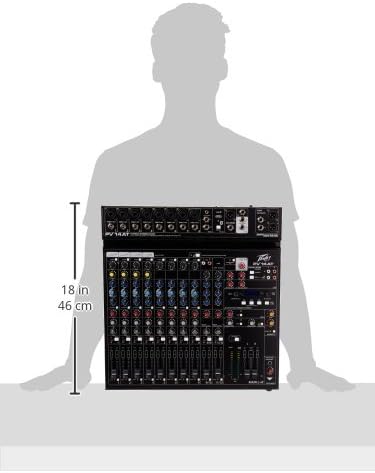
Image: Diagram showing the approximate dimensions of the Peavey PV 14 AT mixer, indicating a height of 18 inches (46 cm).
4. Setup
4.1 Kusunungura
Carefully remove the mixer from its packaging. Retain all packaging materials for future transport or storage. Inspect the unit for any signs of damage incurred during shipping. If damage is found, contact your dealer immediately.
4.2 Simba Connection
- Iva nechokwadi chekuti switch yemagetsi yemuchina wekusanganisa magetsi iri panzvimbo yeOFF.
- Connect the provided power adapter to the DC IN port on the rear panel of the mixer.
- Plug the power adapter into a suitable AC power outlet.
4.3 Audio Connections
Connect your microphones, instruments, and other audio sources to the appropriate input channels. Use XLR cables for microphones and 1/4-inch TRS/TS cables for line-level instruments. Connect your main speakers or recording interface to the MAIN L+R outputs using XLR or 1/4-inch cables.
5. Operating Instructions
5.1 Channel Operation
Each input channel features a GAIN control to adjust input sensitivity, a 3-band EQ (High, Mid, Low) for tone shaping, and AUX SEND controls for monitor mixes or external effects. The channel fader controls the individual channel's level in the main mix. The SOLO button allows you to monitor a single channel without affecting the main output.
5.2 Antares Auto-Tune
The PV 14 AT includes Antares Auto-Tune on select channels. To activate Auto-Tune, locate the dedicated Auto-Tune button on the desired channel and press it. Adjust the Auto-Tune parameters (if available) via the mixer's digital display and controls to achieve the desired pitch correction effect.
5.3 Kubatana kweBluetooth
- Press the Bluetooth button on the mixer to activate Bluetooth pairing mode. The Bluetooth indicator light will flash.
- On your smart device (phone, tablet, computer), search for available Bluetooth devices and select "PV 14 AT" (or similar name).
- Once paired, the Bluetooth indicator light will become solid. You can now stream audio wirelessly to the mixer.
5.4 Digital Migumisiro
The mixer features built-in digital effects. Use the EFFECTS section controls and LCD display to browse and select various effects such as reverb, delay, and chorus. Adjust the effect send levels on individual channels and the master effect return level to blend effects into your mix.
5.5 USB Audio Interface
The Digital Audio Port (USB) on the rear panel allows the PV 14 AT to function as an audio interface for your computer. Connect a USB cable from the mixer to your computer. The mixer will be recognized as an audio input/output device, enabling multi-track recording to a Digital Audio Workstation (DAW) or playback from your computer through the mixer.
6. Kuchengeta
6.1 Kuchenesa
To clean the mixer, use a soft, dry cloth. Do not use abrasive cleaners, solvents, or waxes. Ensure the unit is powered off and disconnected from the power source before cleaning.
6.2 Kuchengeta
When not in use for extended periods, store the mixer in a cool, dry place, away from direct sunlight and extreme temperatures. It is recommended to use the original packaging for protection during storage or transport.
7. Kugadzirisa matambudziko
7.1 Hapana Simba
- Check if the power adapter is securely connected to both the mixer and a working power outlet.
- Iva nechokwadi chekuti switch yemagetsi iri kumashure kwepaneru iri panzvimbo yeON.
- Tarisa kuti magetsi emagetsi ari kushanda nekuisa imwe mudziyo.
7.2 Hapana Mutsindo Unobuda
- Confirm that all channel faders and the MAIN L+R faders are raised.
- Check all audio cables for secure connections and proper functionality.
- Ensure input sources (microphones, instruments) are active and producing sound.
- Verify that the connected speakers or headphones are powered on and functioning correctly.
7.3 Hum or Noise
- Ensure all cables are properly shielded and in good condition.
- Check for ground loops by ensuring all equipment is connected to the same power circuit or using a ground loop isolator.
- Reduce gain levels if input signals are too hot, causing clipping.
7.4 Matambudziko eBluetooth
- Ensure the mixer's Bluetooth is in pairing mode.
- Move your smart device closer to the mixer to ensure it is within range.
- Forget the device from your smart device's Bluetooth settings and attempt to re-pair.
8. Zvinotsanangurwa
| Item Weight | 12 makirogiramu |
| Product Dimensions | 12 x 12 x 12 inches |
| Item Model Number | PV14AT |
| Hardware inowanikwa | Bluetooth |
| Material Type | Simbi isina ngura |
| Musanganisi Chiteshi Uwandu | 14 |
| Simba Source | Corded Electric |
| Kubatana Technology | Bluetooth |
9. Warranty uye Tsigiro
For warranty information and technical support, please refer to the warranty card included with your product or visit the official Peavey website. You can also contact Peavey customer service directly for assistance with product registration, troubleshooting, and service inquiries.


