1. Nhanganyaya
This manual provides essential information and instructions for the safe and efficient use of your Nokia 8 Sirocco TA-1005 smartphone. Please read this guide thoroughly before operating your device to ensure optimal performance and longevity. This device is designed for use with GSM, 3G, and 4G LTE networks. Compatibility with CDMA networks, including Verizon, Sprint, and US Cellular, is not supported. Verify network compatibility with your service provider prior to use.
2. Chii chiri muBhokisi
Upon unboxing your Nokia 8 Sirocco TA-1005, verify that all components are present:
- Nokia 8 Sirocco TA-1005 Device
- USB Type-C Cable
- Power Adapter
- Headset
- SIM Ejector Tool
- Quick Start Guide
- Chengetedzo uye Ruzivo rweWaranti
3. Device Layout
Familiarize yourself with the physical components of your Nokia 8 Sirocco TA-1005.
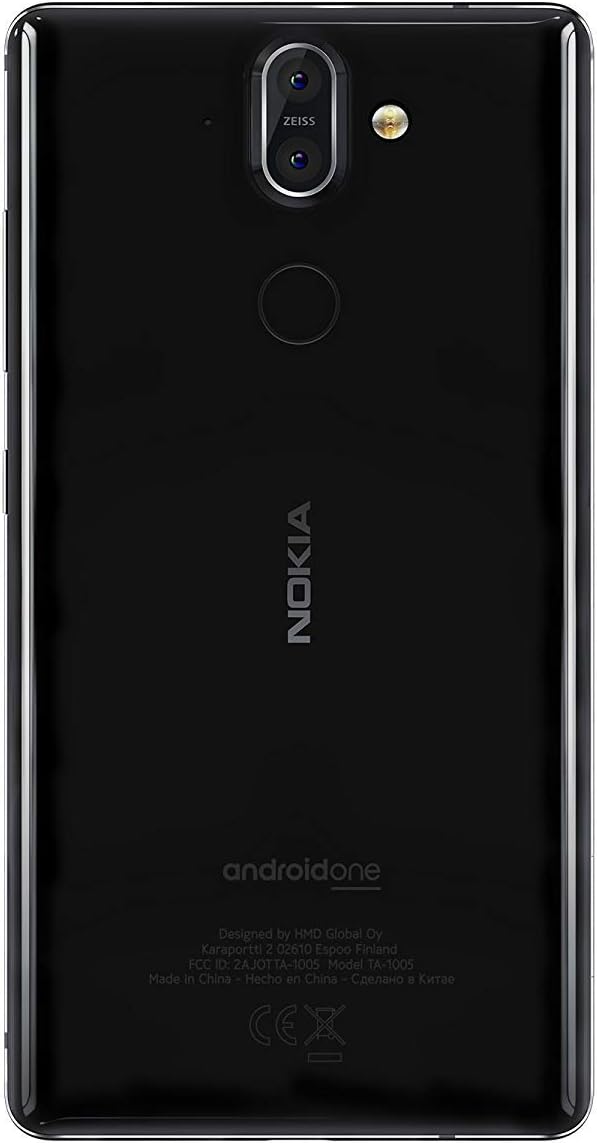
Mufananidzo 3.1: Rear view of the Nokia 8 Sirocco TA-1005. This image displays the dual camera setup with ZEISS optics, the circular fingerprint sensor below the camera, and the Nokia logo centrally placed. The 'androidone' branding is visible towards the bottom.
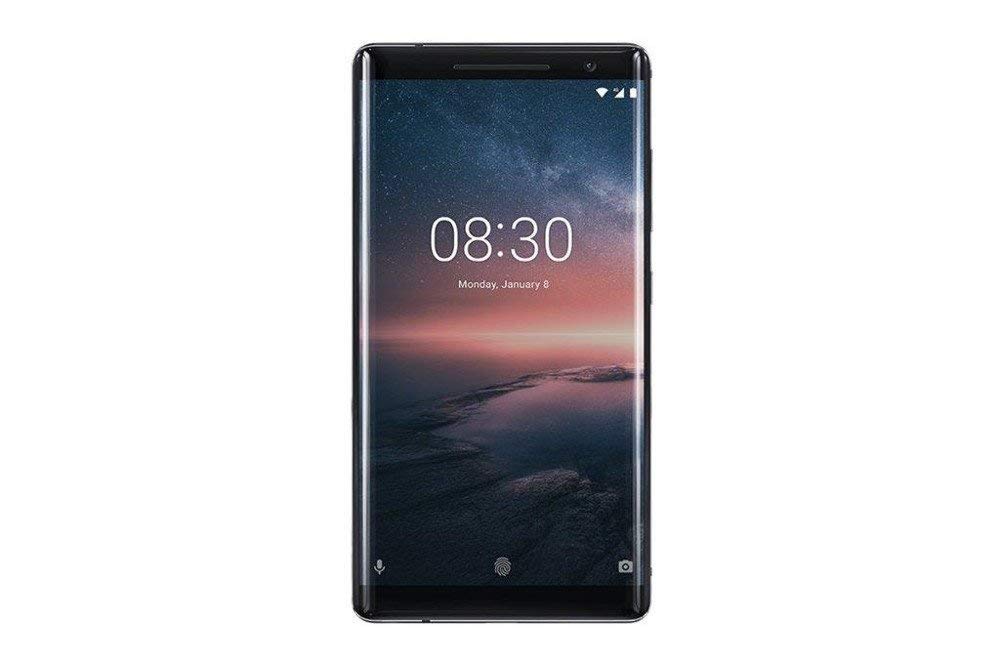
Mufananidzo 3.2: Mberi view of the Nokia 8 Sirocco TA-1005. The image highlights the 5.5-inch P-OLED curved display, the front-facing camera at the top, and the on-screen navigation buttons. The device features minimal bezels.

Mufananidzo 3.3: Side view of the Nokia 8 Sirocco TA-1005. This image illustrates the slim profile of the device, with the power button and volume rocker located on the right side for easy access.
Zvikamu Zvikuru:
- Front Camera: Iri pamusoro pechiratidziro.
- Nzeve: For calls, located above the display.
- Ratidza: 5.5-inch P-OLED capacitive touchscreen.
- Mabhatani eVolume: On the right side, to adjust audio levels.
- Bhatani reSimba/Kukiya: On the right side, to power on/off or lock/unlock the screen.
- USB Type-C Port: Pazasi, yekuchaja uye kuendesa data.
- Maikorofoni: Inowanikwa pasi nepamusoro.
- Mutauri Inowanikwa pazasi.
- SIM/Memory Card Tray: On the side, for inserting SIM cards.
- Rear Camera: Dual cameras with ZEISS optics on the back.
- Flash: Dual-tone flash next to the rear cameras.
- Fingerprint sensor: On the back, below the rear cameras.
4. Setup
4.1. Kuisa SIM Card
- Tsvaga iyo SIM kadhi tireyi padivi pechishandiso chako.
- Isa chishandiso cheSIM ejector muburi diki riri patireyi kuti uvhure.
- Place your Nano-SIM card(s) into the designated slot(s) on the tray, ensuring the gold contacts face downwards.
- Nyatsosaidzira tireyi kumashure mumudziyo kusvika yadzvanya panzvimbo.
Cherechedza: This device does not support external memory cards.
4.2. Powering On uye Off
- Kubatidza: Press and hold the Power/Lock button until the Nokia logo appears.
- Kudzima: Press and hold the Power/Lock button until the power options menu appears, then select "Power off".
4.3. Kutanga Setup
Upon first power-on, the device will guide you through the initial setup process. This includes selecting your language, connecting to a Wi-Fi network, setting up your Google account, and configuring security features like fingerprint unlock or a PIN/pattern.
5. Operating Instructions
5.1. Kufona
- Open the "Phone" application.
- Isa nhamba yefoni uchishandisa dial pad kana sarudza munhu anobva mubhuku rako rekero.
- Tinya chiratidzo chekufona kuti utange kufona.
5.2. Kutumira Mharidzo
- Open the "Messages" application.
- Dzvanya chiratidzo che "Tanga hurukuro" kana "Meseji itsva".
- Isa nhamba yeunogamuchira kana sarudza kubva kune vanobatika.
- Nyora meseji yako mundima yemavara.
- Tinya chiratidzo chekutumira.
5.3. Kushandisa Kamera
- Vhura application ye "Kamera".
- Gadzirisa nyaya yako pachiratidziri.
- Tinya bhatani rekuvhara kuti utore mufananidzo.
- Switch between photo and video modes, or access advanced settings like portrait mode or panorama, as desired.
5.4. Kubatana kweInternet
- Wi-Fi: Enda ku Settings > Network & internet > Wi-Fi. Turn Wi-Fi on and select an available network. Enter the password if required.
- Nharembozha Enda ku Zvirongwa> Network & internet> Mobile network. Ensure "Mobile data" is enabled.
5.5. Security Features
Your Nokia 8 Sirocco TA-1005 offers various security options:
- Kufambiswa Kweminwe: Register your fingerprints via Settings > Security & Location > Fingerprint.
- Kukiya Sikirini: Seta PIN, pateni, kana password kuburikidza Settings > Security & Location > Screen lock.
6. Kuchengeta
6.1. Kuchenesa Chigadzirwa
Use a soft, lint-free cloth to clean your device. Avoid using harsh chemicals or abrasive materials, which can damage the screen or finish.
6.2. Battery Care
- Charge your device using only Nokia-approved chargers and cables.
- Dzivisa kuisa mudziyo kune tembiricha yakanyanyisa.
- Usabvumira bhatiri kuti ribude zvizere nguva zhinji.
6.3. Software Updates
Gara uchitarisa uye kuisa zvigadziriso zvesoftware kuti uone kuti mudziyo wako une zvichangobva kuitika, zvigamba zvekuchengetedza, uye kuvandudzwa kwekuita. Enda ku Settings> System> System update.
7. Kugadzirisa matambudziko
Kana ukasangana nematambudziko nemudziyo wako, tarisa kune anotevera akajairika mhinduro:
| Dambudziko | Solution |
|---|---|
| Mudziyo haubatike | Ensure the battery is charged. Connect to a charger for at least 30 minutes. If unresponsive, perform a force restart by holding the Power button for 10-15 seconds. |
| Simba retiweki chiratidzo | Check SIM card insertion. Move to an area with better network coverage. Restart the device. Verify network settings in Zvirongwa> Network & internet> Mobile network. |
| Applications are crashing | Bvisa cache yeapp (Magadzirirwo > Mapurogiramu & zviziviso > [Zita reApp] > Kuchengetera & cache > Bvisa cache) Gadziridza app kubva kuGoogle Play Store. Kana nyaya ikaramba iripo, bvisa uye dzosera iyo app. |
| Bhatiri rinopera nekukurumidza | Reduce screen brightness. Close unused background apps. Disable Wi-Fi, Bluetooth, and GPS when not in use. Check battery usage in Settings > Bhatiri kuziva maapplication anoshandisa simba. |
| Mudziyo hausi kudavira | Perform a force restart by holding the Power button for 10-15 seconds. If the issue continues, consider a factory reset (Settings> System> Reset sarudzo> Bvisa data rese (factory reset)). Yambiro: A factory reset will erase all data on your device. Back up important data before proceeding. |
8. Zvinotsanangurwa
Detailed technical specifications for the Nokia 8 Sirocco TA-1005:
| Feature | Detail |
|---|---|
| Model Name | 8 Sirocco |
| Model Number | TA-1005 |
| Operating System | Android 8.0 (Oreo) |
| processor | Qualcomm MSM8998 Snapdragon 835, Octa-core (4x2.5 GHz Kryo & 4x1.8 GHz Kryo) |
| GPU | Adreno 540 |
| RAM | 6 GB |
| Kuchengeta Kwemukati | 128 GB |
| Display | 5.5 inches, P-OLED capacitive touchscreen, 1440 x 2560 pixels, Corning Gorilla Glass 5 |
| Rear Camera | 12MP Wide (f/1.7) + 13 MP Tele (f/2.6), dual-tone flash |
| Front Camera | 5MP |
| Battery Capacity | 3250 mAh |
| Kuchaja | Fast Kuchaja Tsigiro |
| Kubatana | Wi-Fi 802.11a/b/g/n, Bluetooth, USB Type-C |
| Dimensions | 43.36 x 43.17 x 0.75 cm |
| Kurema | 181 g |
| SIM Type | Nano-SIM |
| Network Support | 2G GSM, 3G, 4G LTE (Note: Not compatible with CDMA networks) |
9. Safety and Warranty Information
9.1. Mirayiridzo Yekuchengetedza
- Do not use the device in prohibited areas, such as aircraft or hospitals.
- Dzivisa kuisa mudziyo kumvura kana kunyorova zvakanyanya.
- Use only original or approved accessories.
- Usaedze kudimbura kana kugadzirisa mudziyo wega.
- Rasa mudziyo uye bhatiri rayo zvine hungwaru maererano nemitemo yenzvimbo.
9.2. Ruzivo rweWaranti
Your Nokia 8 Sirocco TA-1005 is covered by a limited manufacturer's warranty. Please refer to the separate warranty document included in your product packaging or visit the official Nokia support webWebhusaiti kuti uwane mitemo nemipimo yakadzama. Chengeta humbowo hwekutenga kwako kuti uwane zvikumbiro zvewaranti.


