1. Nhanganyaya
This manual provides detailed instructions for the safe and efficient operation of your InFocus P120 INL412 Multimedia Projector (Model INL4128). Please read this manual thoroughly before using the projector and keep it for future reference. This projector is designed for high-quality image projection, suitable for various applications including presentations, home entertainment, and gaming.
2. Safety Information
Observe the following safety precautions to prevent damage to the projector and ensure user safety:
- Kufefetedza Iva nechokwadi chekuti mhepo inofefetera yakakwana yakatenderedza purojekita. Usavhare maburi emhepo. Chengeta daro risingasviki 30 cm (12 inches) kubva pamadziro kana zvimwe zvinhu.
- Kunobva Simba: Shandisa chete iyo yakatarwa magetsi uye voltage. Connect the power cord securely.
- Kupisa: The projector generates heat during operation. Do not touch the projector's vents or exhaust areas directly after use.
- Light Output: Usatarise zvakananga muprojekita lens kana iyo lamp is on, as the intense light can cause eye damage.
- Kuiswa: Place the projector on a stable, level surface. Avoid placing it in direct sunlight, near heat sources, or in areas with high humidity or dust.
- Kuchenesa: Bvisa tambo yemagetsi usati waichenesa. Shandisa jira rakapfava, rakaoma. Usashandise zvinochenesa mvura kana zveaerosol.
- Sevhisi: Usaedza kugadzirisa purojekita wega. Tumira mabasa ese ekugadzirisa kune vashandi vane hunyanzvi.
3. Chigadzirwa Pamusoroview
3.1 Top Panel and Lens Area
The top panel features the control buttons for basic operation and the lens area with focus and zoom adjustments.

Mufananidzo 3.1: Pamusoro view of the InFocus P120 INL412 projector, highlighting the control panel on the right and the lens adjustment area on the left. The InFocus logo is visible on the top surface.
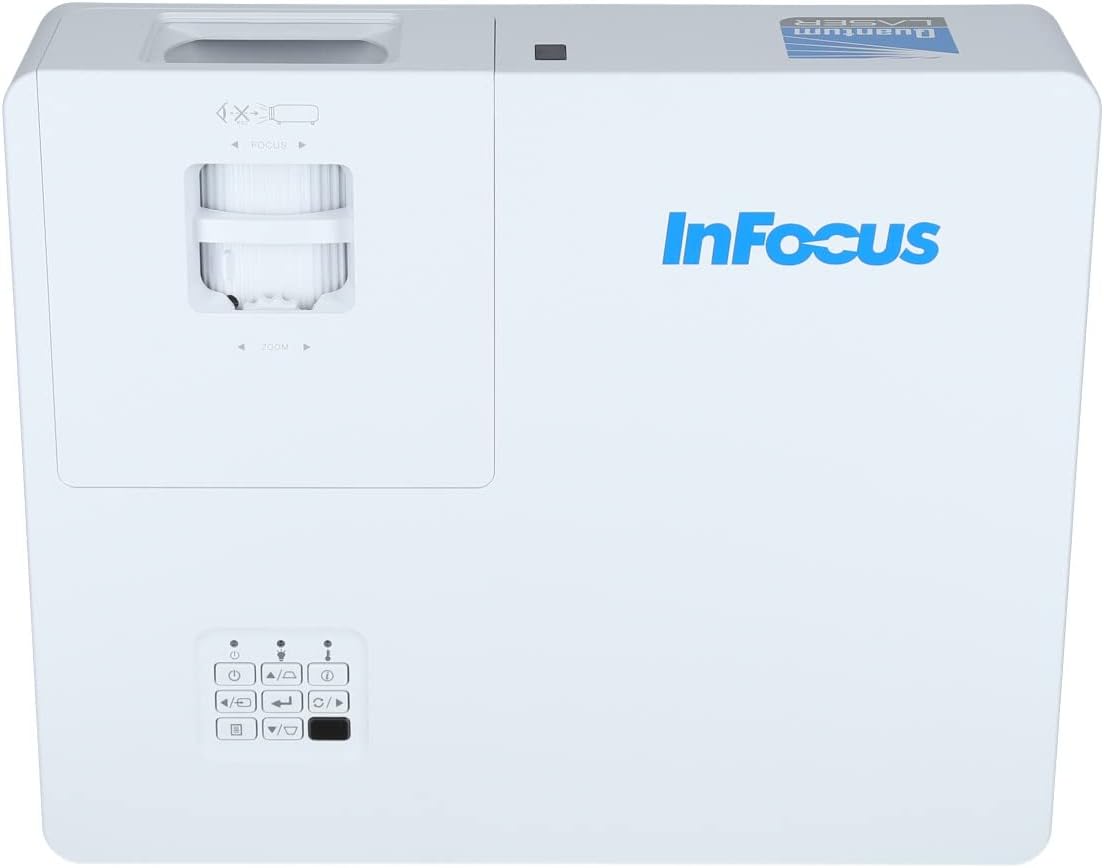
Mufananidzo 3.2: Kuswedera pedyo view of the projector's top panel, showing the focus and zoom rings near the lens opening and the array of control buttons for power, menu, source selection, and navigation.
3.2 Rear Panel Connections
The rear panel provides various input and output ports for connecting external devices.

Figure 3.3: Rear panel of the InFocus P120 INL412 projector, displaying a comprehensive array of connectivity options including HDMI (x2), USB, S-Video, Ethernet (LAN), VGA In (x2), VGA Out, RS232, and Audio In/Out ports. The power input is located on the bottom left.
Key ports zvinosanganisira:
- HDMI 1 & 2: For connecting high-definition digital video and audio sources.
- USB: For connecting USB devices, potentially for media playback or firmware updates.
- S-Vhidhiyo: For connecting older video sources.
- VGA IN 1 & 2: For connecting computers or other devices with VGA output.
- VGA OUT: For connecting to an external monitor.
- Ethernet (LAN): For network connectivity and control.
- Audio IN 1 & 2 / Audio OUT: Kune analog audio connections.
- RS232: Yekudzora serial.
- Power Input: Yekubatanidza tambo yemagetsi yeAC.
3.3 Front and Side Panels
The front panel houses the projection lens and front ventilation, while the side panels feature additional ventilation grilles.

Mufananidzo 3.4: Mberi view of the InFocus P120 INL412 projector, displaying the main projection lens on the right and the extensive front ventilation grille on the left, crucial for heat dissipation.

Mufananidzo 3.5: Rutivi view of the InFocus P120 INL412 projector, illustrating the side ventilation grilles that contribute to maintaining optimal operating temperature.
4. Setup
4.1 Kuiswa kwePurojekita
Position the projector on a stable, flat surface or mount it securely. Ensure the projector is within the optimal projection distance for your screen size. Maintain clear space around the projector for proper ventilation.
4.2 Kubatanidza Zvishandiso
Before connecting any cables, ensure the projector and all source devices are powered off.
- HDMI Connection: Connect an HDMI cable from your source device (e.g., laptop, Blu-ray player, gaming console) to either the HDMI 1 or HDMI 2 port on the projector.
- VGA Connection: Connect a VGA cable from your computer to either VGA IN 1 or VGA IN 2. For audio, connect a separate audio cable from your computer's audio output to the corresponding Audio IN port on the projector.
- USB Connection: Insert a USB drive into the USB port for media playback (if supported by firmware) or service functions.
- Ethernet (LAN) Connection: Connect an Ethernet cable to the LAN port for network control or updates.
- Audio Output: If using external speakers, connect an audio cable from the Audio OUT port on the projector to your audio system.
4.3 Simba Connection
Connect the power cord to the projector's power input and then plug the other end into a grounded electrical outlet.
5. Operating Instructions
5.1 Kubatidza/Kudzima
- Power On: Press the Simba button on the projector's control panel or the remote control. The power indicator light will change.
- Power Off: Press the Simba button again. A confirmation message may appear. Press the button a second time to confirm shutdown. Allow the projector to cool down before unplugging it.
5.2 Adjusting Focus and Zoom
Rotate the focus ring around the lens until the image appears sharp and clear. Use the zoom ring to adjust the image size to fit your screen.
5.3 Kusarudza Manyuko Ekupinda
Press the Source button on the control panel or remote control to cycle through available input sources (HDMI 1, HDMI 2, VGA 1, VGA 2, S-Video, USB). Select the input corresponding to your connected device.
5.4 Menyu Navigation
Shandisa iyo Menu button to access the on-screen display (OSD) menu. Use the arrow buttons to navigate through menu options and the Enter bhatani rekusarudza. Dzvanya Menu zvakare kubuda.
6. Kuchengeta
6.1 Kuchenesa Lenzi
Gently wipe the lens with a soft, lint-free cloth specifically designed for optical surfaces. Do not use abrasive cleaners or excessive force, as this can scratch the lens.
6.2 Cleaning the Projector Exterior
Shandisa jira rakapfava, rakaoma kuchenesa purojekitaasing. For stubborn dirt, dampen the cloth slightly with water, then wipe dry immediately. Avoid getting liquids into the projector's openings.
6.3 Ventilation Care
Regularly check the projector's ventilation grilles for dust accumulation. Use a soft brush or a vacuum cleaner with a brush attachment to gently remove dust from the vents to ensure proper airflow and prevent overheating.
7. Kugadzirisa matambudziko
7.1 Hapana Mufananidzo Unoratidzwa
- Ensure the projector is powered on and the power indicator light is solid.
- Verify that the video cable (HDMI, VGA, etc.) is securely connected to both the projector and the source device.
- Check that the correct input source is selected on the projector.
- Confirm that the source device (laptop, player) is powered on and outputting a signal.
7.2 Image is Blurry or Out of Focus
- Gadzirisa mhete yekutarisa pane lenzi yepurojekita kusvika mufananidzo wanyatsojeka.
- Ensure the projector is at the correct distance from the screen.
- Clean the projector lens if it appears dirty.
7.3 Hapana Inzwi
- If using HDMI, ensure the source device's audio output is set to HDMI.
- If using VGA, ensure a separate audio cable is connected from the source to the projector's Audio IN port.
- Tarisa marongero evhoriyamu papurojekita nepamudziyo unobva ruzha.
- If using external speakers, ensure they are properly connected to the Audio OUT port and powered on.
8. Zvinotsanangurwa
| Feature | Detail |
|---|---|
| Brand | InFocus |
| Mugadziri | In Focus |
| Model Name | P120 INL412 |
| Model Number | INL4128 |
| Gore | 2023 |
| Hardware inowanikwa | Ethernet, HDMI, S-Video, USB |
| Nhamba Yezvinhu | 1 |
| Aspect ratio | 16:9 |
| Wattage | 341 watts |
| Mabhatiri Akabatanidzwa | Aihwa |
| Mabhatiri Anodiwa | Aihwa |
| Fomu Factor | Desktop |
| Mounting Type | Tafura mount |
| Remote Control Inosanganisirwa | Ehe |
| Product Dimensions | 56.13 x 46.48 x 25.15 cm |
| Item Weight | 5.5 kg |
| Maximum Image Size | 308.28 inches |
| Minimum Image Size | 910.63 mamirimita |
| Kutanga Kuwanikwa Zuva | Ndira 5, 2022 |
9. Warranty uye Tsigiro
For warranty information and technical support, please refer to the documentation included with your purchase or visit the official InFocus website. Chengetedza humbowo hwako hwekutenga kune warranty claim.


