1. Nhanganyaya
The Pknight DMX Wall Mounted Controller CR003P is a self-contained DMX control station designed for convenient operation of DMX lighting fixtures. It functions as a playback device for scenes and chases programmed on a compatible 192 DMX board. Its wall-mountable design and intuitive button layout make it suitable for everyday use in various settings, including churches, schools, and architectural lighting installations. The controller features a built-in microphone for sound-activated functions and utilizes standard network cables for DMX signal transmission.
2. Chigadzirwa Pamusoroview
2.1. Zvimiro
- Designed for use with Pknight 192 DMX boards to playback 12 scenes and 12 chases.
- Wall-mountable design resembling a standard light switch for easy access.
- Built-in microphone with adjustable sensitivity for sound-activated DMX control.
- Transmits DMX signals via inexpensive network cables.
- Easy setup with permanent data storage.
- Supports automatic program execution upon booting for unattended applications.
2.2. Zvikamu uye Zviteshi
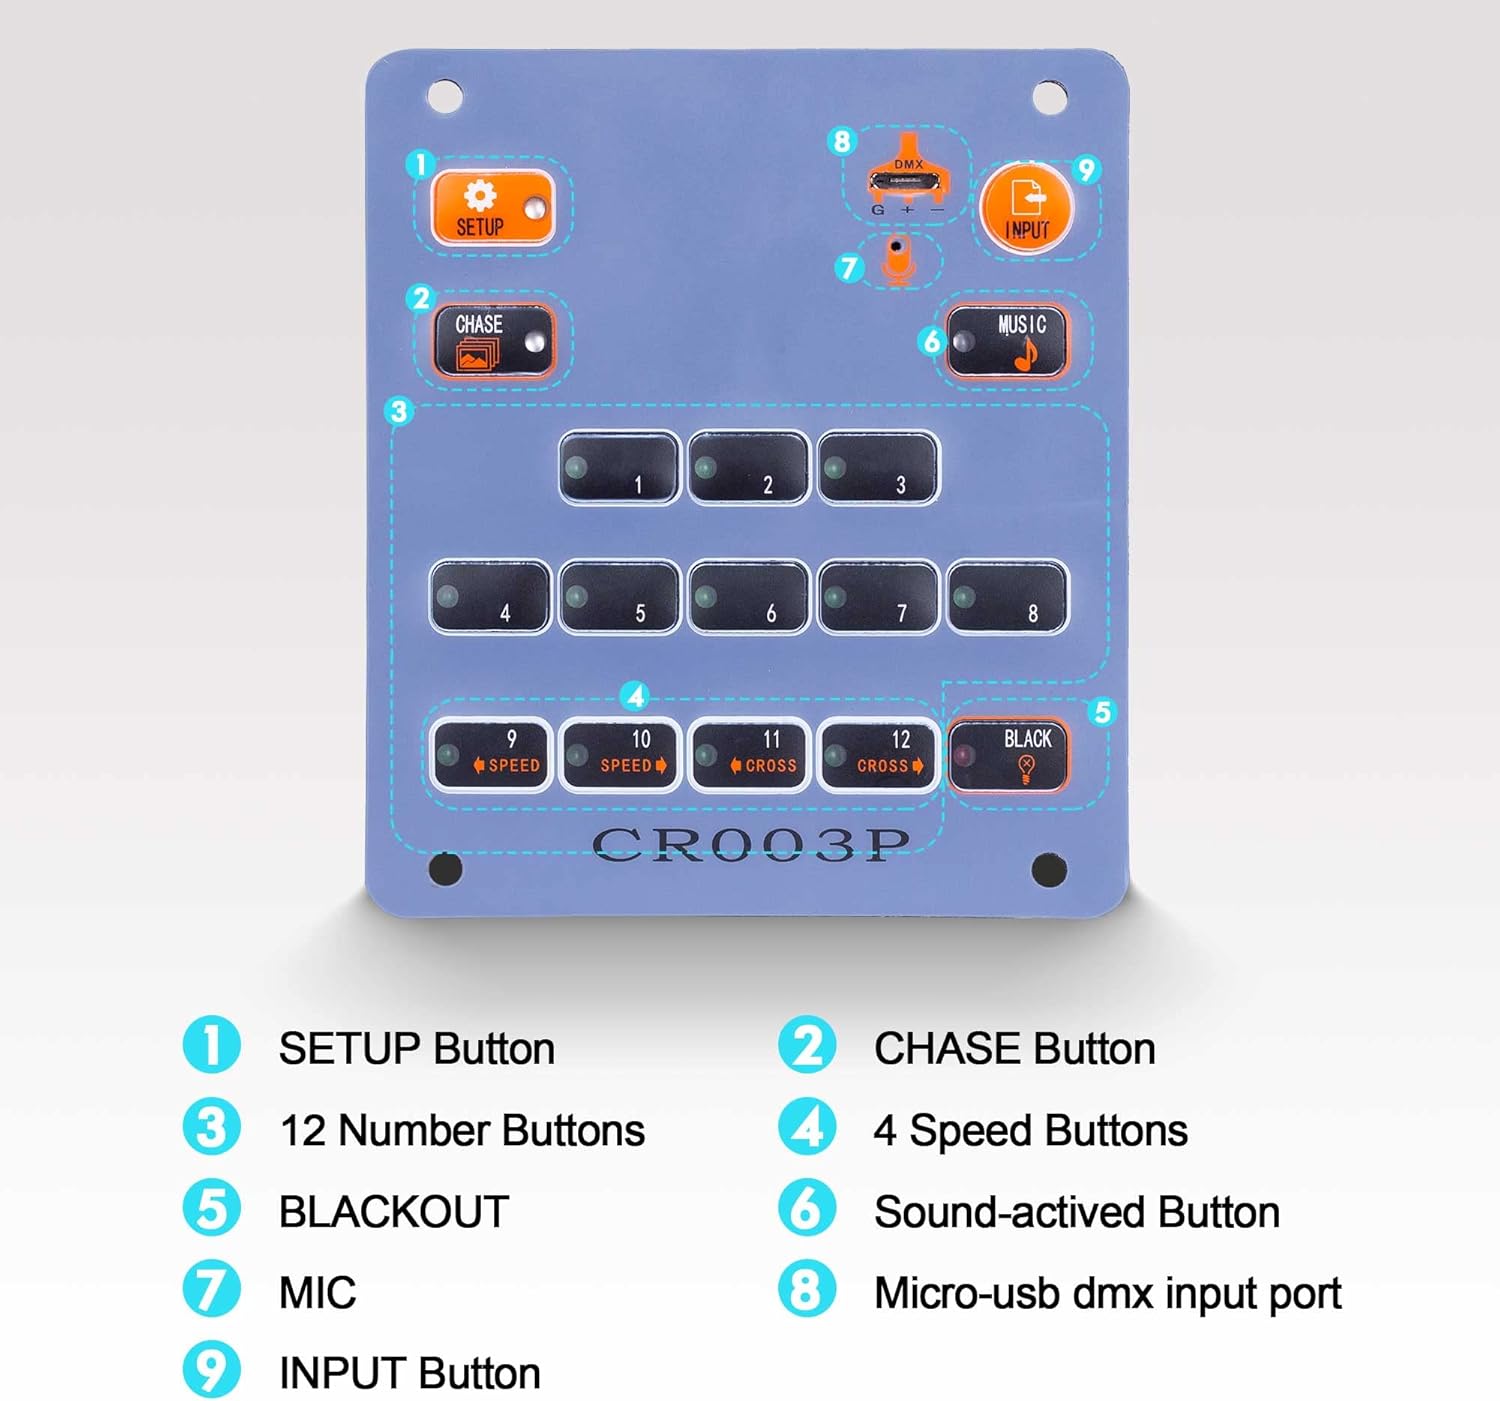
Figure 1: Front Panel Layout of CR003P
- 1. SETUP Button: Used for configuration and programming.
- 2. CHASE Button: Toggles between scene and chase playback modes.
- 3. 12 Number Buttons (1-12): Selects specific scenes or chases.
- 4. 4 Speed Buttons (9-12): Adjusts the speed of chases (buttons 9-12 also function as speed/cross buttons).
- 5. BLACKOUT Button: Turns off all DMX output.
- 6. Sound-activated Button (MUSIC): Activates sound-controlled DMX functions.
- 7. MIC: Built-in microphone for sound detection.
- 8. Micro-USB DMX Input Port: For DMX signal input (via adapter).
- 9. INPUT Button: Used to import data from the 192 DMX console.

Figure 2: Rear Panel Ports of CR003P
- 5V Power Port: Connects to the included 5V power adapter.
- Input RJ45 Port: Receives DMX data from the 192 DMX board.
- Output RJ45 Port: Sends DMX signals to DMX fixtures.
- High-Precision Knob (MUSIC): Adjusts the sensitivity of the built-in microphone.
2.3. Zviyero

Figure 3: CR003P Dimensions
- Urefu: 3.8 inches (9.8 cm)
- Upamhi: 3.4 inches (8.6 cm)
- Kudzika: 1 inch (2.6 cm)
3. Setup
The Pknight DMX Wall Mounted Controller CR003P is designed for easy installation and integration with a Pknight 192 DMX board. Follow these steps for initial setup:
- Power Connection: Connect the included 5V power adapter to the 5V Power Port on the rear panel of the CR003P.
- DMX Input: Connect the Input RJ45 Port of the CR003P to the DMX output of your Pknight 192 DMX board using a network cable.
- DMX Output: Connect the Output RJ45 Port of the CR003P to your DMX lighting fixtures using a network cable.
- Data Import: Ensure your 192 DMX board is powered on and configured with the desired scenes and chases. Press and hold the INPUT button on the CR003P to import the programmed data from the 192 DMX board. The data will be saved permanently on the CR003P.
- Kukwidza: The CR003P is wall-mountable. Ensure proper electrical box compatibility and secure mounting for everyday use.

Figure 4: CR003P Wall Mounted
3.1. Video Tutorial: DMX Wall Panel Setup
Video 1: Detailed tutorial on setting up and using the Pknight DMX Wall Panel.
3.2. Video Tutorial: Pknight 192 DMX Controller Programming
Video 2: Tutorial on programming scenes and chases on the Pknight 192 DMX Controller, which can then be imported to the wall panel.
4. Operating Instructions
Once the DMX data (scenes and chases) has been imported from your 192 DMX board, the CR003P is ready for operation. The controller allows for quick selection and activation of lighting effects.
- Scene/Chase Selection: Press any of the 12 Number Buttons (1-12) to instantly activate the corresponding scene or chase that was programmed on your 192 DMX board.
- Kuchinja kweModhi: Press the CHASE button to toggle between scene playback mode and chase playback mode.
- Speed Adjustment (Chase Mode): Use the 4 Speed Buttons (buttons 9-12, which also function as number buttons) to adjust the playback speed of active chases.
- Kudzima magetsi: Press the BLACKOUT button to immediately turn off all DMX output, effectively blacking out all connected lights. Press it again to restore the previous lighting state.
- Sound-Activated Control: Press the MUSIC button to activate the sound-controlled DMX function. The built-in microphone will detect ambient sound, and the lighting effects will respond dynamically. Adjust the High-Precision Knob on the rear panel to fine-tune the microphone's sensitivity.
- Automatic Run: The controller can be configured to automatically run specific programs after booting, making it suitable for unattended applications such as environment lighting or street scenes. Refer to the detailed video tutorial for programming this feature.
5. Kuchengeta
To ensure the longevity and optimal performance of your Pknight DMX Wall Mounted Controller CR003P, follow these maintenance guidelines:
- Kuchenesa: Use a soft, dry cloth to clean the surface of the controller. Avoid using abrasive cleaners or solvents that could damage the finish or internal components.
- Environment: Install the controller in a dry environment, away from direct sunlight, excessive heat, or extreme cold. Ensure proper ventilation if installed in an enclosed space.
- Connections: Periodically check all cable connections (power, DMX input/output) to ensure they are secure and free from damage.
- Firmware Dzokorora: Check the Pknight official website for any available firmware updates to ensure your controller has the latest features and bug fixes.
6. Kugadzirisa matambudziko
If you encounter issues with your Pknight DMX Wall Mounted Controller CR003P, refer to the following troubleshooting steps:
- Hapana Simba: Ensure the 5V power adapter is correctly connected to the controller and plugged into a working power outlet. Check the power indicator light on the rear panel.
- No DMX Output/Lights Not Responding:
- Verify that the DMX Input and Output RJ45 cables are securely connected.
- Confirm that the 192 DMX board is powered on and transmitting DMX signals.
- Ensure that DMX data has been successfully imported to the CR003P using the INPUT button.
- Check that the BLACKOUT button is not active (lights should not be off due to blackout).
- Verify that your DMX fixtures are correctly addressed and configured to receive DMX signals.
- Sound-Activated Mode Not Working:
- Ensure the MUSIC button is active.
- Adjust the High-Precision Knob on the rear panel to increase the microphone sensitivity.
- Ensure there is sufficient ambient sound for the microphone to detect.
- Mamiriro ezvinhu: While the device is designed for wall mounting, ensure that the chosen electrical box or mounting surface provides adequate clearance for all connections (power, RJ45 cables) to avoid strain or damage.
For further assistance, refer to the detailed video tutorials or contact Pknight customer support.
7. Zvinotsanangurwa
- Muenzaniso: CR003P
- Chinhu Weight: 1.03 makirogiramu
- Zviyero zvechigadzirwa: 9.4 x 5.7 x 2.5 inches
- Power Input: 5V DC (adapter included)
- DMX Channel: Playback for 12 scenes/12 chases (programmed on 192 DMX board)
- Control Interface: Buttons for scene/chase selection, mode, speed, blackout, setup, input, music.
- Kubatana: RJ45 DMX Input/Output, Micro-USB DMX Input (via adapter)
- Special Features: Built-in microphone with adjustable sensitivity, permanent data storage, automatic program run.
8. Warranty uye Tsigiro
For warranty information, technical support, or service inquiries regarding your Pknight DMX Wall Mounted Controller CR003P, please refer to the product packaging or contact Pknight customer service directly through their official webnzvimbo kana mutengesi uko chigadzirwa chakatengwa.


