1. Nhanganyaya
This manual provides detailed instructions for the safe and efficient installation, operation, and maintenance of your Link2Home Extend & Tilt TV Wall Mount. Designed for televisions ranging from 42 to 90 inches and supporting up to 154 pounds, this mount offers versatile viewing options with its extendable, swivel, and tilt features. Please read all instructions carefully before beginning installation.
Zvinokosha:
- Universal TV Wall Mount for 42" to 90" screen sizes.
- Supports up to 154 pounds.
- Compatible with Flat and Curved Screen TVs & Monitors.
- Profile extends 3.1" to 5.3" from the wall.
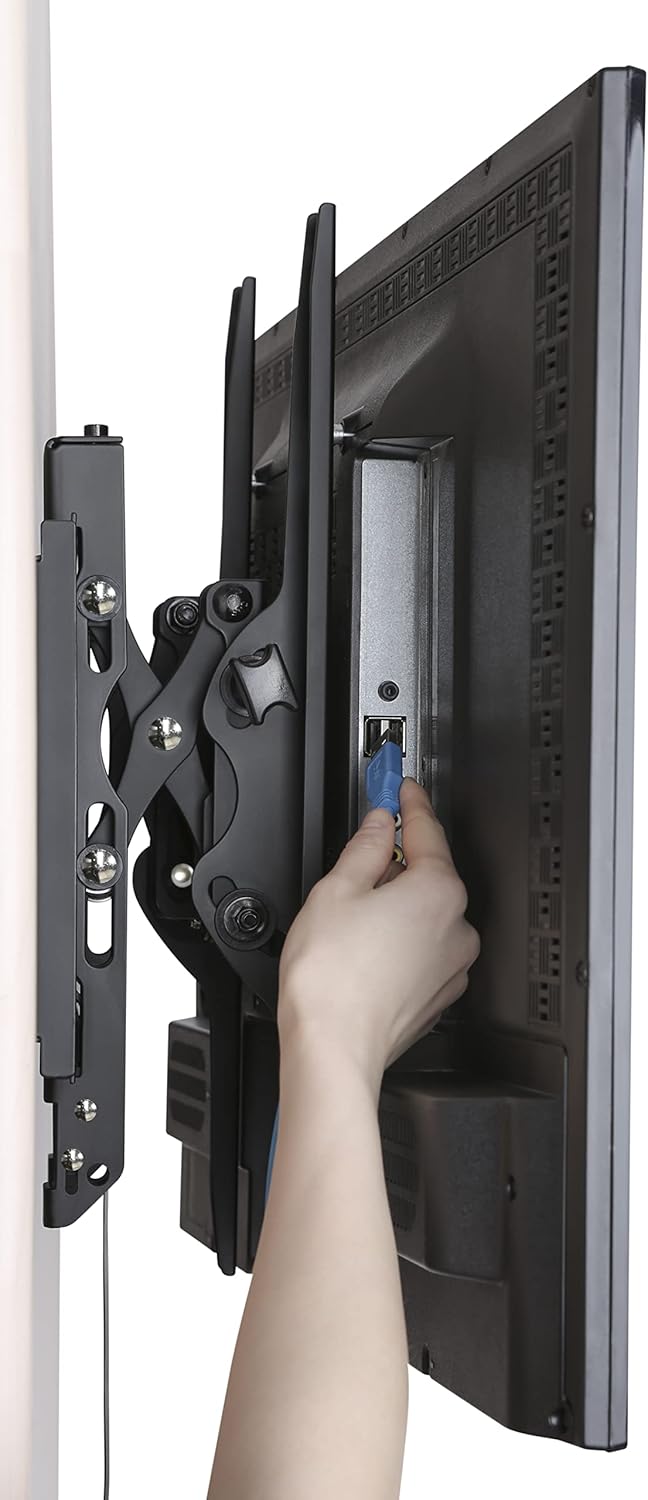
- Open architecture for increased ventilation and easy access to wires.
- Adjustable tilt range: +5° to -12°.
- Adjustable swivel range: +5° to -5°.
- Screen level adjustment: +-0.98".
- Easy-grip knobs for quick, toolless tilt and lock.
- Anti-theft locking hole (padlock not included).
- Automatic click-in spring lock for secure hold.
- VESA compatibility: 200x200 mm to 600x400mm.
- Includes all necessary hardware and a built-in level.
- Mounts on wood studs, brick, concrete, and sheetrock/plasterboard walls.
2. Safety Information
- Weight Capacity: Do not exceed the maximum weight capacity of 154 lbs (70 kg). This mount is designed for use with specified maximum weights. Use with products heavier than the maximum weights indicated may result in instability causing possible injury.
- Kukura Kwesikirini: This mount is suitable for TVs between 42" and 90".
- Mounting Surface: Iva nechokwadi chekuti nzvimbo yekuisira inogona kutsigira huremu hwemidziyo pamwe chete nezvose zvakabatanidzwa zvakachengeteka.
- Professional Installation: Kana usina chokwadi nezvemaitirwo ekuisa madziro ako kana kukodzera kwawo, bvunza nyanzvi ine hunyanzvi.
- VESA Kuenderana: Verify your TV's VESA mounting pattern (distance between screw holes on the back of the TV) is within the supported range of 200x200mm to 600x400mm.
- Zvishandiso: Shandisa maturusi akakodzera pakuisa. Pfeka magirazi ekuchengetedza nguva dzose.
- Vana: Chengetedza vana kure nenzvimbo yekuisa.
3. Package Zviri mukati
Your Link2Home Extend & Tilt TV Wall Mount package includes the following components and hardware:
- Kuungana kwePlati remadziro
- TV Brackets (Left and Right)
- Assorted TV Screws, Washers, and Spacers
- Lag Bolts and Wall Anchors (for various wall types)
- Yakavakwa-mukati Level
- Cable Ties (for cord management)
- Bhuku reMirayiridzo

4. Setup uye Kuiswa
Follow these steps carefully to install your TV wall mount:
Step 1: Attach TV Brackets to Your TV
- Isa TV yako zvakanaka-naka panzvimbo yakapfava, yakachena kuti isakwenya.
- Ziva maburi anokwira eVESA kuseri kweTV yako.
- Select the appropriate screws, washers, and spacers from the provided hardware kit that fit your TV's VESA pattern.
- Attach the left and right TV brackets to the back of your TV, ensuring they are securely fastened. The hooks on the brackets should face upwards.

Danho rechipiri: Tsvaga Nzvimbo Yekuisa Pamadziro
- Determine the desired height for your TV.
- Use a stud finder to locate wood studs in your wall. Mark the edges and center of the studs. For brick or concrete walls, ensure you have the correct anchors.
- Hold the wall plate against the wall at your desired height and use the built-in level to ensure it is perfectly horizontal. Mark the pilot hole locations.
Danho rechitatu: Isa puratifomu yemadziro kumadziro
- Drill pilot holes at the marked locations. The size of the drill bit will depend on your wall type (wood, brick, concrete).
- If installing into concrete or brick, insert the appropriate wall anchors into the pilot holes.
- Align the wall plate with the pilot holes and secure it to the wall using the provided lag bolts. Tighten all bolts firmly.

Danho rechitatu: Isa TV pamadziro
- With assistance, carefully lift the TV and hook the attached TV brackets onto the wall plate.
- Ensure both TV brackets are properly seated and engaged with the wall plate. The automatic click-in spring lock will snap into place for a secure hold.
Kuisa Vhidhiyo:
5. Operating Instructions
Your Link2Home Extend & Tilt TV Wall Mount offers flexible viewing angles:
Kugadzirisa Tilt:
- To adjust the vertical tilt angle (+5° to -12°), loosen the easy-grip knobs on the TV brackets.
- Adjust the TV to your desired tilt angle.
- Tighten the easy-grip knobs to lock the TV in place.
Adjusting Swivel:
- The mount allows for a swivel range of +5° to -5°. Gently push or pull the side of the TV to achieve the desired horizontal vieweng angle
Extending/Retracting:
- The mount can extend from 3.1" to 5.3" from the wall. Gently pull the TV forward or push it back towards the wall.

Accessing Wires:
- The extendable profile and open architecture provide easy access to cables and ports on the back of your TV.
6. Kuchengeta
- Kugara Kuongorora: Periodically check that all screws and bolts are securely tightened.
- Kuchenesa: Clean the mount with a soft, dry cloth. Avoid using abrasive cleaners or solvents.
- Lubrication: No lubrication is required for the moving parts.
7. Kugadzirisa matambudziko
- TV Kwete Nhamba: Use the screen level adjustment feature by twisting the screws on the arms for micro-adjustment. Ensure the wall plate was installed level using the built-in level.
- Difficulty Adjusting Tilt/Swivel: Ensure the easy-grip knobs are sufficiently loosened before attempting to adjust the tilt. For swivel, apply gentle, even pressure.
- TV Feels Loose: Double-check that all mounting bolts on the wall plate and TV brackets are securely tightened. Ensure the automatic click-in spring lock is engaged.
- Cannot Remove TV from Mount: Pull the release strings located at the bottom of the TV brackets to disengage the locking mechanism.
8. Zvinotsanangurwa
| Tsanangudzo | Detail |
|---|---|
| Brand | Link2Home |
| Model | B0B72CCPY4 |
| Screen Saizi Kuenderana | 42" - 90" |
| Weight Capacity | Kusvikira ku154 lbs (70 kg) |
| VESA kuenderana | 200x200mm kusvika 600x400mm |
| Tilt Angle | +5° kusvika -12° |
| Swivel Angle | +5° kusvika -5° |
| Extension Profile | 3.1" kusvika 5.3" |
| Material | Metal |
| Color | Nhema |
| Mounting Type | Gomo reMasvingo |
| Product Dimensions | 28.15 x 8.54 x 3.62 inches |
| Item Weight | 10.38 makirogiramu |
9. Warranty uye Tsigiro
The Link2Home Extend & Tilt TV Wall Mount comes with a Hupenyu hwese Warranty. For any questions, technical support, or warranty claims, please refer to the contact information provided in your product packaging or visit the official Link2Home website.


