1. Nhanganyaya
This manual provides detailed instructions for the installation, operation, and maintenance of the Supermicro X13SEI-F Server Motherboard. This motherboard is designed for high-performance server applications, supporting Intel Xeon processors with an LGA4677 socket and DDR5 memory.
Please read this manual thoroughly before attempting to install or operate the motherboard to ensure proper setup and to prevent damage to the components.
2. Safety Information
Chengeta matanho ekuchengetedza anotevera kudzivirira kukuvara nekukuvadzwa kwemidziyo:
- Always disconnect the power cord from the power supply before installing or removing any components.
- Wear an anti-static wrist strap when handling the motherboard and other components to prevent electrostatic discharge (ESD).
- Ensure the installation environment is dry and free from static electricity.
- Usafumure iyo mamaboard kune hunyoro kana kupisa kwakanyanya.
- Bata mamaboard nemapendero ayo kudzivirira kubata zvinhu zvinonzwisa tsitsi.
- Refer to the power supply unit's manual for specific safety guidelines related to power connections.
3. Package Zviri mukati
Verify that all items are present and in good condition. If any items are damaged or missing, contact your vendor.
- Supermicro X13SEI-F Server Motherboard
- Ini / O Shield
- SATA Cables (quantity may vary)
- Quick Reference Guide / User Manual (this document)
- Driver CD/DVD or USB drive (or download instructions)
4. Chigadzirwa Pamusoroview
The Supermicro X13SEI-F is a high-performance server motherboard featuring the LGA4677 socket, designed to support Intel Xeon Scalable processors. It offers robust memory capabilities with 8 DDR5 DIMM slots, supporting up to 4800MHz memory speed. The board also includes multiple PCIe slots for expansion.
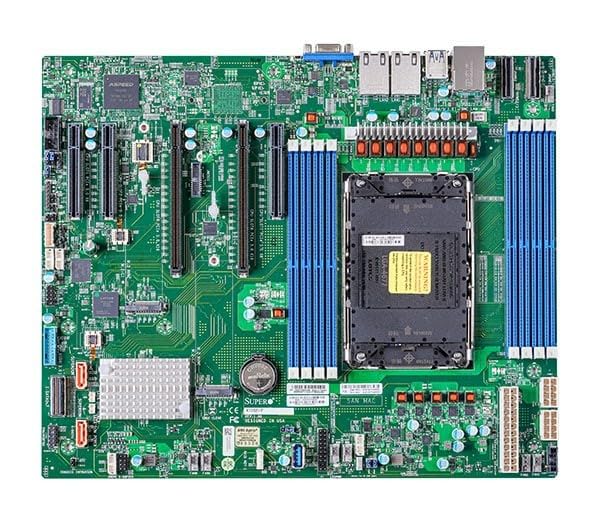
Figure 1: Supermicro X13SEI-F Server Motherboard. This image displays the overall layout of the motherboard, including the CPU socket, DIMM slots, and various connectors.
4.1 Mamiriro Akakosha
- CPU Chigadziko: LGA4677 for Intel Xeon Scalable Processors
- Chipset: Intel C621
- Memory: 8x DDR5 DIMM slots, up to 4800MHz
- Kuwedzera Slots: Multiple PCIe slots (specific configuration depends on model variant)
- Kuchengeta: Support for various storage interfaces (SATA, NVMe - specific details in specifications)
- Networking: Integrated LAN controllers
5. Setup uye Kuiswa
Before beginning installation, ensure your system case is compatible with the motherboard's form factor and that you have all necessary components.
5.1 CPU Installation (LGA4677)
- Locate the LGA4677 socket on the motherboard.
- Carefully open the CPU socket retention mechanism according to the instructions provided with your CPU or motherboard.
- Align the CPU with the socket, ensuring the triangular mark on the CPU matches the mark on the socket. Do not force the CPU into the socket.
- Dzikisa CPU zvinyoro nyoro mu socket.
- Close the CPU socket retention mechanism until it locks securely.
- Isa iyo CPU inotonhorera zvinoenderana nemirairo yemugadziri wayo.
5.2 Kuiswa kweRAM (DDR5)
- Locate the 8 DDR5 DIMM slots on the motherboard.
- Open the retention clips at both ends of the DIMM slot.
- Gadzirisa notch paDDR5 memory module nekiyi muDIMM slot.
- Insert the memory module firmly into the slot until the retention clips snap into place. Ensure both clips are closed.
- For optimal performance, refer to the motherboard's manual for recommended memory population order.
5.3 PCIe Kadhi Kuiswa
- Identify the appropriate PCIe slot for your expansion card (e.g., GPU, RAID card).
- Remove the corresponding expansion slot cover from your chassis.
- Align the PCIe card with the slot and press down firmly until it is fully seated.
- Secure the card with a screw or retention clip to the chassis.
5.4 Kuisa Chishandiso Chekuchengetedza
- SATA Drives: Connect SATA data cables from the motherboard's SATA ports to your SATA hard drives or SSDs. Connect power cables from the PSU to the drives.
- NVMe M.2 Drives: Locate the M.2 slots. Insert the M.2 drive at an angle, then push it down and secure it with the provided screw or retention mechanism.
5.5 Simba rekubatanidza
- Batanidza chinobatanidza simba cheATX chine mapini makumi maviri nemana kubva pamagetsi ako kuenda ku soketi huru yemagetsi iri pabhodhi reamai.
- Connect the 8-pin (or 4+4 pin) EPS 12V CPU power connector(s) to the corresponding sockets near the CPU.
- Ita shuwa kuti magetsi ese ekubatanidza akachengeteka.
5.6 Front Panel Connections
Connect the front panel cables (Power LED, HDD LED, Power Switch, Reset Switch, USB, Audio) from your chassis to the corresponding headers on the motherboard. Refer to the motherboard's silkscreen labels or the detailed manual for exact pin configurations.
6. Operating Instructions
6.1 Kutanga Boot
- After completing all hardware installations, connect the monitor, keyboard, and mouse.
- Connect the power cord to the power supply and turn on the power switch on the PSU.
- Press the power button on your chassis.
- The system should power on, and you should see the BIOS/UEFI POST screen.
6.2 BIOS/UEFI Setup
Kuisa iyo BIOS/UEFI setup utility, tinya iyo DEL or F2 key repeatedly during the POST process. Within the BIOS/UEFI, you can configure:
- Boot order
- System nguva uye zuva
- CPU and memory settings
- Storage configurations (RAID, AHCI)
- Fan speed control
- Chengetedzo marongero
Chengetedza shanduko usati wabuda muBIOS/UEFI.
6.3 Operating System Kuiswa
Insert your operating system installation media (USB drive or DVD) and set it as the primary boot device in the BIOS/UEFI. Follow the on-screen instructions to install your preferred operating system. After installation, install all necessary drivers from the Supermicro website or the provided driver media.
7. Kuchengeta
7.1 Kuchenesa
- Regularly clean dust from the motherboard and system components using compressed air.
- Ita shuwa kuti sisitimu yadzimwa uye yakavhurwa isati yachenesa.
- Dzivisa kushandisa mvura yekuchenesa zvakananga pane zvikamu.
7.2 Firmware Updates
Periodically check the Supermicro website for updated BIOS/UEFI firmware. Firmware updates can improve system stability, performance, and compatibility. Follow the specific instructions provided by Supermicro for updating the firmware to avoid system damage.
8. Kugadzirisa matambudziko
Ichi chikamu chinopa mhinduro kune zvakajairika zvaungasangana nazvo.
8.1 Hapana Simba / Hapana POST (Kuzviedza Kwesimba)
- Tarisa Power Connections: Ensure the 24-pin ATX and 8-pin EPS 12V power connectors are securely seated.
- Verify PSU: Test the power supply unit (PSU) with another system or a PSU tester.
- Reseat Components: Reseat the CPU, RAM modules, and any expansion cards.
- Bvisa CMOS: Refer to the motherboard manual for instructions on how to clear the CMOS (Complementary Metal-Oxide-Semiconductor) settings, which can resolve boot issues.
- Minimum Configuration: Try booting with only the CPU, one RAM stick, and the necessary power connections.
8.2 Hapana Chiratidziro Chinobuda
- Monitor Connection: Ensure the monitor is properly connected to the graphics output (either integrated or discrete GPU) and is powered on.
- Graphics Card: If using a discrete graphics card, ensure it is fully seated in its PCIe slot and has all necessary power connectors from the PSU.
- Integrated Graphics: If your CPU supports integrated graphics, try connecting the monitor to the motherboard's video output to rule out a discrete GPU issue.
8.3 Operating System Not Booting
- Boot Order: Check the BIOS/UEFI settings to ensure the correct boot device (e.g., SSD, HDD) is selected as the primary boot option.
- Drive Connections: Verify that your storage drives are properly connected (data and power).
- Kuiswa kweOS: If the OS is newly installed, ensure the installation process completed successfully and all drivers are installed.
9. Zvinotsanangurwa
| Feature | Detail |
|---|---|
| Brand | Supermicro |
| Model Name | MBD-X13SEI-F-B |
| CPU Socket | LGA 4677 |
| Inowirirana processors | Intel Xeon Scalable |
| Chipset Type | Intel C621 |
| RAM Memory Technology | DDR5 |
| Memory Speed | 4800 MHz |
| RAM Slots | 8x DDR5 DIMM slots |
| Zviyero zveChigadzirwa (LxWxH) | 16 x 12 x 5 inches |
| Item Weight | 3.19 makirogiramu |
| Kutanga Kuwanikwa Zuva | Ndira 20, 2023 |
Note: Specifications are subject to change without notice. For the most current information, please refer to the official Supermicro product page.
10. Warranty uye Technical Support
10.1 Ruzivo rweWaranti
Supermicro products are covered by a limited warranty. For detailed warranty terms and conditions, including duration and coverage, please visit the official Supermicro website or consult the warranty card included with your product. Keep your proof of purchase for warranty claims.
10.2 Tsigiro yehunyanzvi
For technical assistance, driver downloads, BIOS updates, and further product information, please visit the official Supermicro support websaiti:
https://www.supermicro.com/support
Before contacting support, please have your motherboard model number (MBD-X13SEI-F-B) and serial number ready.


