1. Nhanganyaya
This manual provides essential information for setting up, operating, and maintaining your Beelink Mini S13 Mini PC. Please read it thoroughly before using the device to ensure proper function and longevity.

Image: The Beelink Mini S13 Mini PC in a typical desktop setup.
2. Package Zviri mukati
Tarisa uone kuti zvinhu zvese zviripo mupakeji:
- 1 x Beelink Mini S13 N150 Mini PC
- 1 x Chinyorwa cheMushandisi
- 1 x HDMI Cable
- 1 x Power Adapter
- 1 x Wall-mounted Bracket

Image: Contents of the Beelink Mini S13 package.
3. Setup Instructions
3.1 Connecting the Mini PC
- Batanidza kuChiratidziro: Use the provided HDMI cable to connect the Mini PC to your monitor or TV. The Mini S13 supports dual 4K 60Hz displays.
- Batanidza Peripherals: Plug in your USB keyboard, mouse, and any other USB devices into the available USB 3.2 Gen2 ports.
- Batanidza kune Network: For wired internet, connect an Ethernet cable to the 2.5G LAN port. For wireless internet, the device supports WiFi 6.
- Batanidza Simba: Plug the power adapter into the DC Jack on the Mini PC, then connect it to a power outlet.
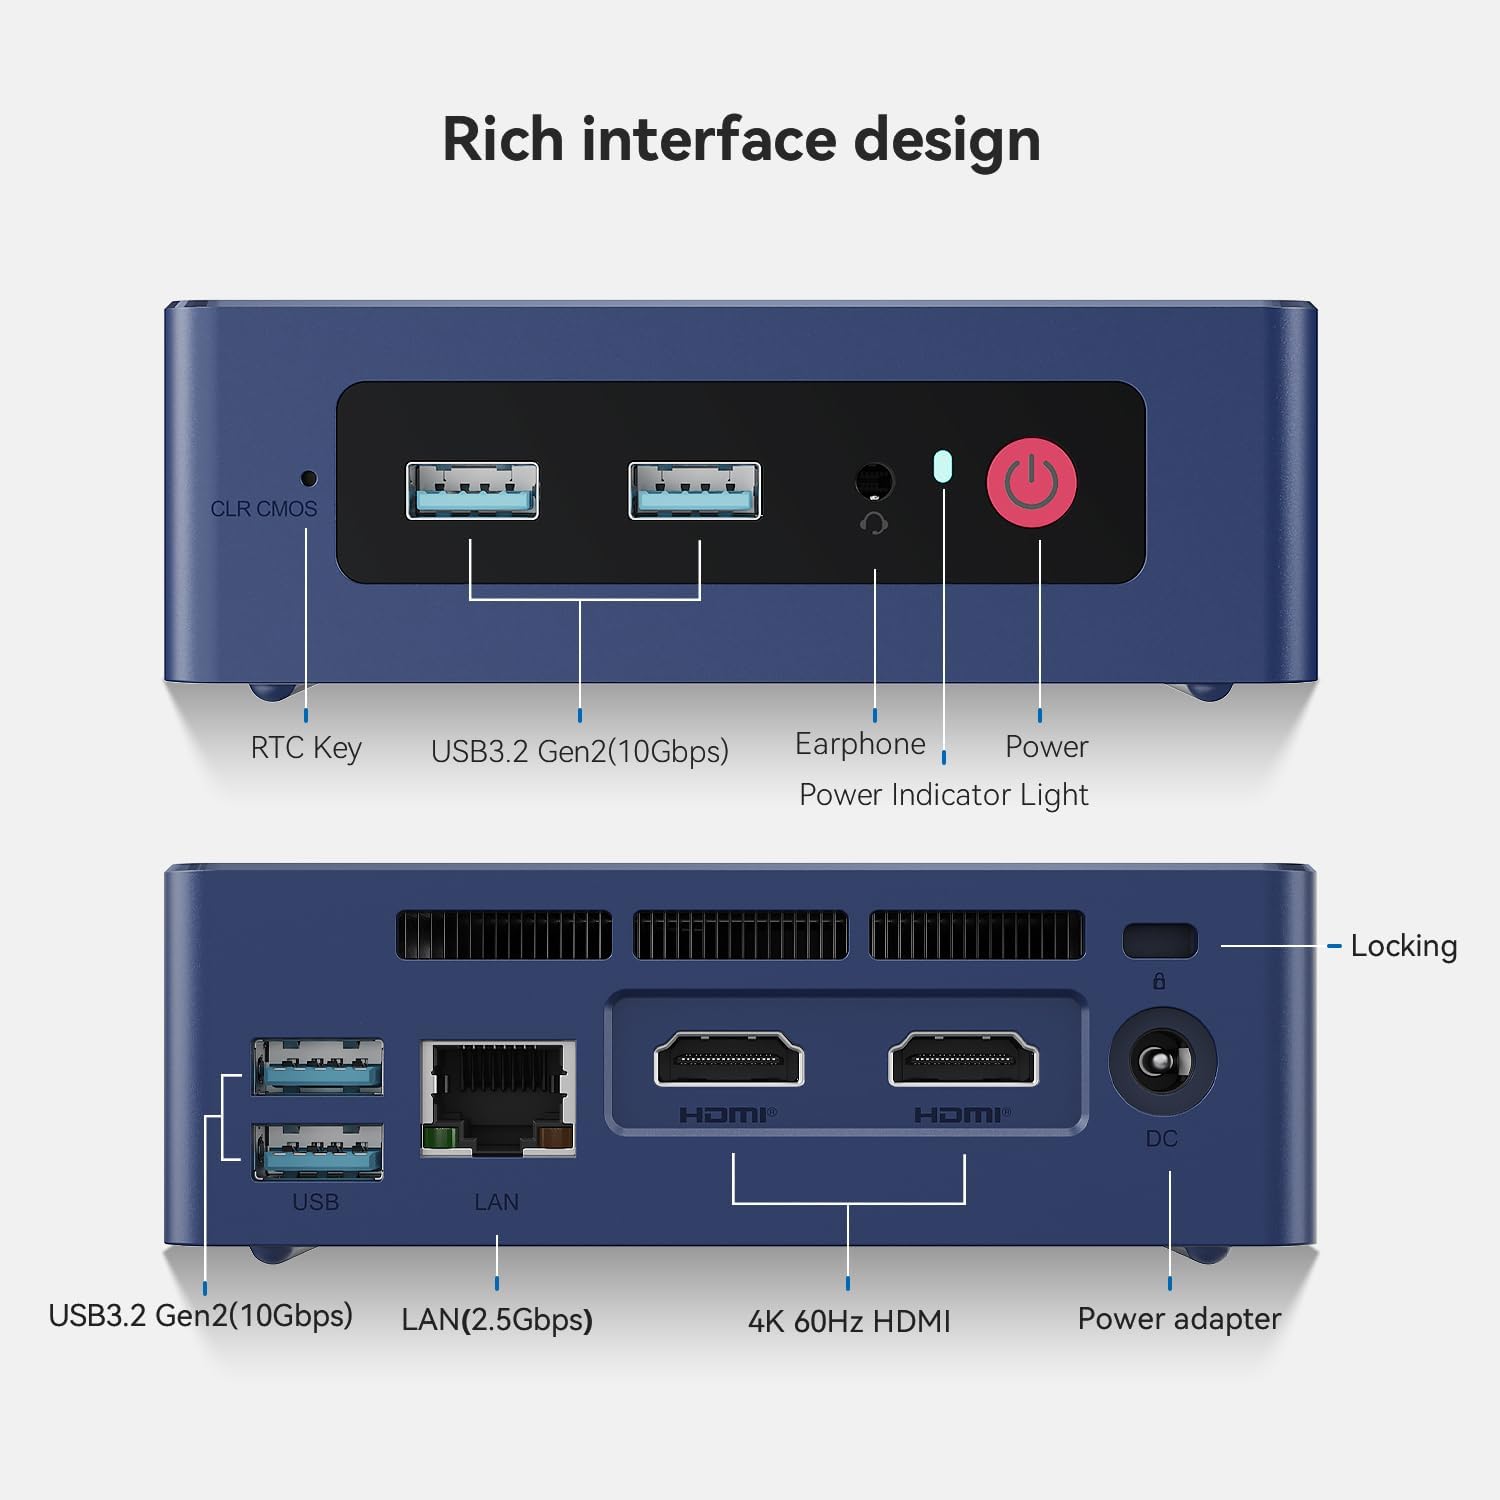
Image: Front and rear interfaces of the Mini S13.
3.2 Kutanga Boot
- Press the power button located on the front of the Mini PC. The power indicator light will illuminate.
- Follow the on-screen instructions to complete the initial operating system setup.
3.3 Kuiswa Kwemadziro
The included wall-mounted bracket allows you to attach the Mini PC to the back of a VESA-compatible monitor or to a wall. Secure the bracket using appropriate screws, then slide the Mini PC into place.
4. Operating Instructions
4.1 Simba On/Kudzima
- Power On: Dzvanya bhatani remagetsi.
- Power Off: Shandisa basa rekudzima reoperating system. Neimwe nzira, tinya wobata bhatani rekudzima kwemasekonzi mashanu kuti umanikidze kudzima (shandisa chete kana zvichidikanwa).
4.2 Kugadzika Kwezviratidziro Zviviri
The Mini PC supports connecting two displays simultaneously via its two HDMI ports. This feature enhances multitasking and productivity.

Image: Dual-screen display setup for enhanced work efficiency.
4.3 Network Kubatana
- Wired Network: Connect an Ethernet cable to the 2.5G LAN port for high-speed wired internet access.
- Wireless Network (WiFi 6): Access network settings in your operating system to connect to available WiFi 6 networks.
- Makaralı 5.2: Pair Bluetooth devices such as keyboards, mice, or headphones through your operating system's Bluetooth settings.

Image: Wireless connectivity features including WiFi 6 and Bluetooth 5.2.
4.4 Kuwedzera Kwekuchengetera Zvinhu
The Mini PC comes with a 512GB SATA3 SSD and supports dual-channel storage expansion up to 4TB. You can add or upgrade M.2 SSDs (NVMe 2280 or SATA3 SSDs) in the available slots.

Image: Dual SSD high-speed storage slots for expansion.
5. Kuchengeta
5.1 Kuchenesa
- Regularly clean the exterior of the Mini PC with a soft, dry cloth.
- Ensure ventilation openings are free from dust and debris to maintain optimal airflow. Use compressed air if necessary.
5.2 Kutonhodza System
The Mini S13 features a silent fan and heat sink system designed for efficient cooling. Avoid blocking the air vents to prevent overheating and ensure stable performance.

Image: CPU silent fan and heat sink system.
5.3 Zvigadziriso zveSoftware
Keep your operating system and drivers updated to ensure system stability, security, and optimal performance.
6. Kugadzirisa matambudziko
- Hapana Chiratidziro:
- Check HDMI cable connections to both the Mini PC and the monitor.
- Iva nechokwadi chekuti monitor yakabatidzwa uye yakaiswa panzvimbo chaiyo yekuisa.
- Edza tambo yeHDMI yakasiyana kana kutarisa kana iripo.
- Hapana Simba:
- Verify the power adapter is securely connected to the Mini PC and a working power outlet.
- Ita shuwa kuti bhatani remagetsi rakadzvanywa zvakasimba.
- Network Connectivity Matambudziko:
- Kana muine waya dzekubatanidza, tarisai kuti tambo yeEthernet uye router zviri papi.
- For wireless connections, ensure WiFi is enabled in the operating system and you are connected to the correct network with the correct password.
- Tangazve yako router / modem.
- System Slowdown/Overheating:
- Ensure the Mini PC's ventilation openings are not blocked.
- Vhara zvisina basa zvikumbiro zvinomhanya kumashure.
- Check for excessive dust accumulation and clean as described in the Maintenance section.
7. Zvinotsanangurwa
| Feature | Detail |
|---|---|
| processor | 13th Gen Intel Alder Lake-N150 (4C/4T, up to 3.6GHz) |
| Graphics | Intel UHD Graphics 24EUs 1000MHz |
| RAM | 12GB LPDDR5 4800MT/s |
| Storage | 512GB SATA3 SSD (Expandable up to 4TB dual-channel) |
| Ratidza Output | 2 x HDMI (Max 4K 60Hz), Dual Display Support |
| USB Ports | 4 x USB 3.2 Gen2 (10Gbps) |
| Network | 2.5G LAN, WiFi 6 (802.11ax), Bluetooth 5.2 |
| Vadivelu Comedy Audio | 1 x 3.5mm Phone Jack (Two-in-One) |
| Power Input | 5.5*2.5 DC Jack, 12V/3A Adapter |
| Dimensions | 4.52 x 4.01 x 1.54 inches (115 x 102 x 39 mm) |
| Operating System | OS (Pre-installed Windows 11 Home typically) |
| Zvimwe Zvimiro | RTC Key, CLR CMOS Button, Wake On LAN, Auto Power ON |
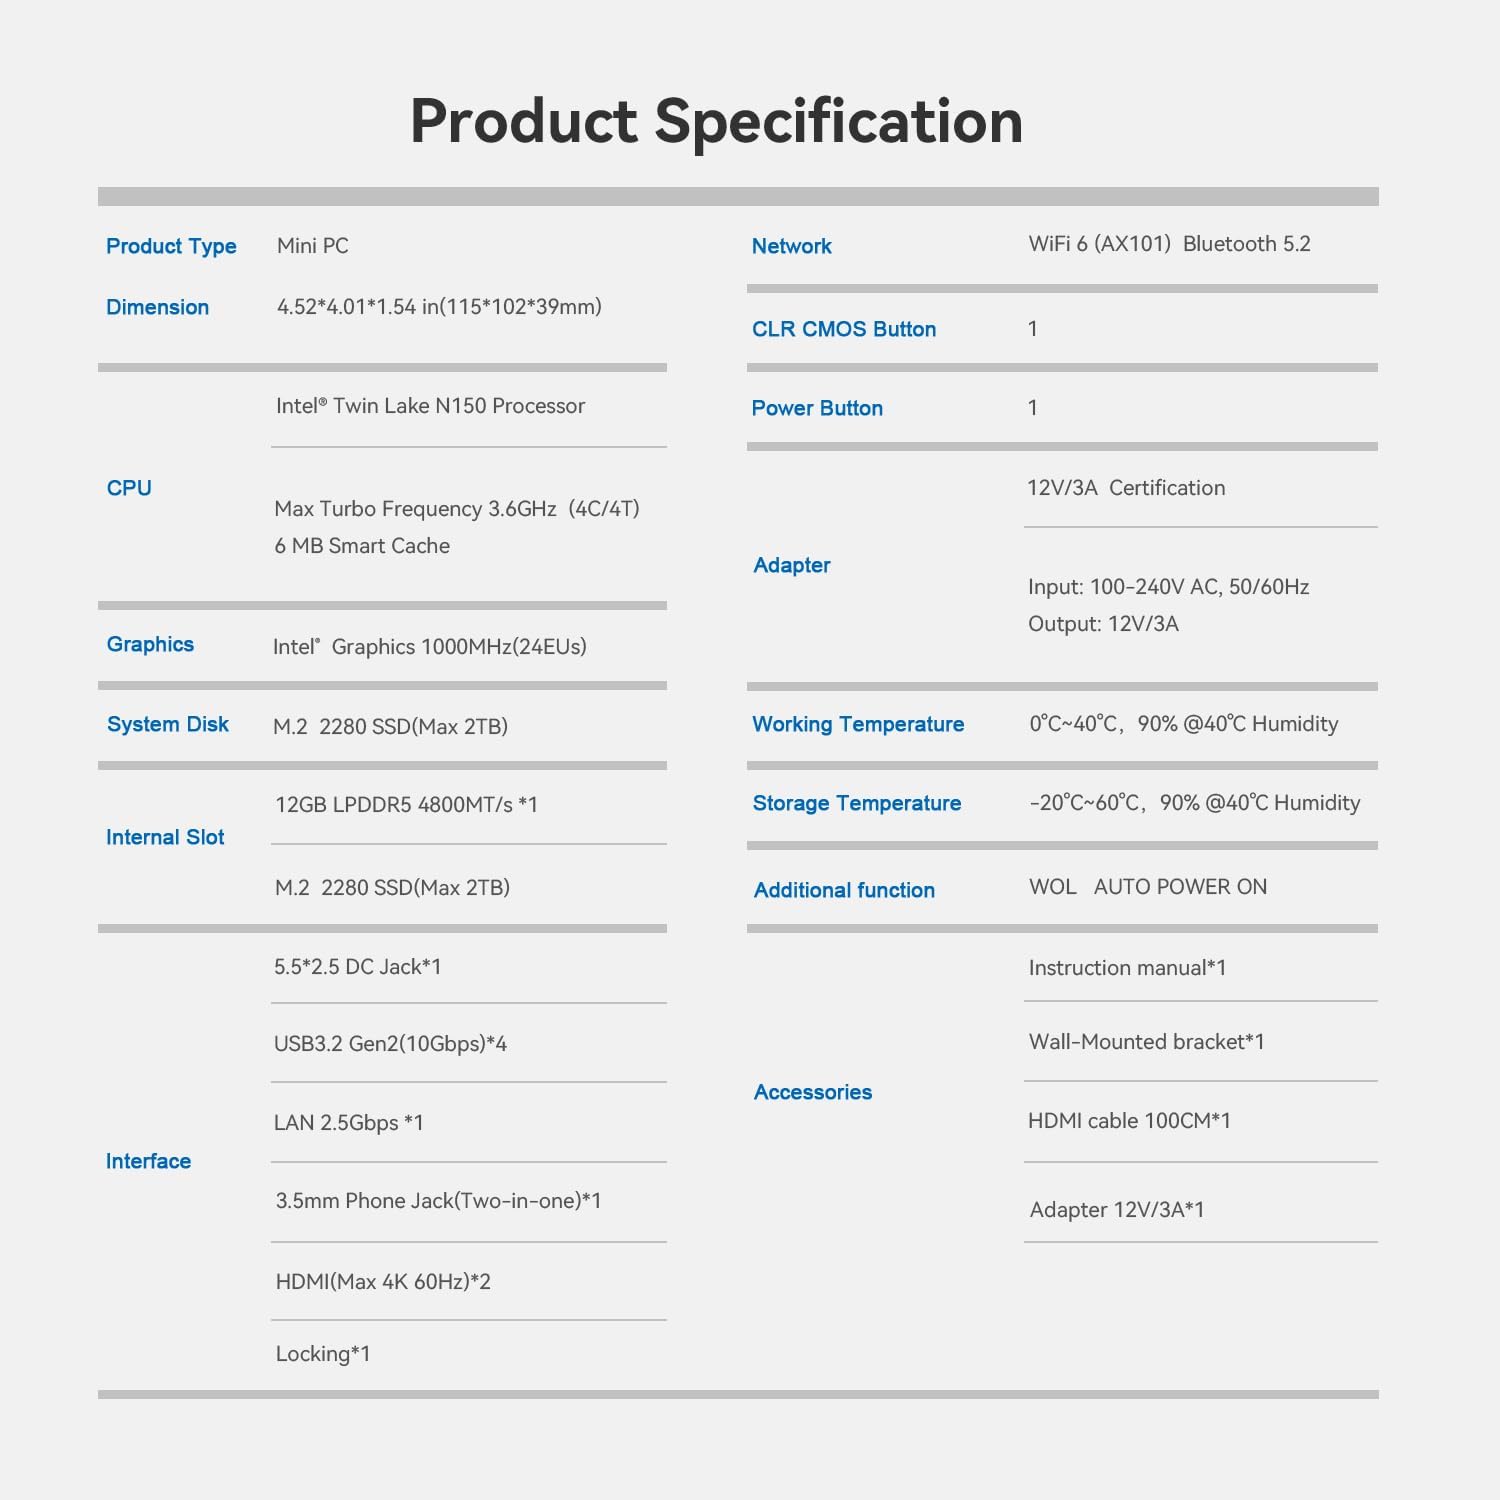
Image: Product Specification Table.
8. Warranty uye Tsigiro
Beelink provides customer support and warranty services for its products. For specific warranty details and support inquiries, please refer to the following:
- Warranty: Typically includes a 1-year free maintenance period.
- Tsigiro yehunyanzvi: Lifetime technical support is generally provided.
- Mabatiro evatengi: 7 days a week, 24 hours a day customer service.
- Inodzoka: Products are typically eligible for refund/replacement within 30 days of purchase.
For assistance, you can contact Beelink support through the platform where you purchased the product (e.g., Amazon's 'Your Account' -> 'Your Orders' -> 'Click Get Help').

Image: Beelink After-Sales Service Information.


