Nhanganyaya
The Sound Town SDRK-ST16T is a DIY slanted studio rack designed for organizing audio equipment in recording rooms and home studios. This rack features a total of 16U of space, divided into an 8U top section and an 8U lower section, separated by a slide-out tray. An additional 2U bottom compartment with a flip-open cover provides extra storage. Constructed from 15mm plywood with a Golden Oak finish, the rack is designed for durability and stability. It includes pre-cut, pre-installed rack rails, 10/32 screws for equipment mounting, and four casters for mobility, two of which are lockable.
Safety Information
- Always assemble the rack on a flat, stable surface to prevent tipping.
- Iva nechokwadi chekuti screws dzese nezvisungo zvakasimbiswa zvakanaka panguva yekubatanidza.
- Do not overload the rack. Refer to the specifications for weight limits.
- When moving the rack, ensure all casters are unlocked. Lock casters when the rack is in its desired position to prevent accidental movement.
- Keep small parts and tools away from children during assembly.
Package Zviri mukati
Iva nechokwadi chekuti zvikamu zvese zviripo usati watanga kusangana:
- Plywood panels for the rack frame
- Pre-installed rack rails (8U top, 8U lower)
- Slide-out tray with mounting hardware
- 2U bottom storage compartment components
- Four casters (two with lever brakes)
- Tsoka dzisina kutsvedza rubber
- Assembly screws and 10/32 rack screws
- Assembly tools (e.g., Allen wrench, screwdriver - may not be included)
Setup uye Assembly
The Sound Town SDRK-ST16T is designed for straightforward assembly. Follow these steps to construct your studio rack:
- Unpack Components: Carefully remove all parts from the packaging and lay them out on a clean, flat surface. Identify each panel and hardware piece.
- Unganidza Main Frame: Connect the side panels to the top and bottom panels using the provided screws. Ensure the pre-installed rack rails are oriented correctly, with the slanted rails facing the front.
- Install Slide-Out Tray: Attach the slide mechanisms to the designated slots for the central tray. Carefully insert the slide-out tray into these mechanisms. Ensure smooth operation.
- Assemble 2U Bottom Storage: Construct the 2U bottom storage compartment and attach its flip-open cover. Integrate this section into the lower part of the rack frame.
- Attach Casters/Feet: Secure the four casters to the bottom of the rack. Two casters include lever brakes for locking. Alternatively, attach the non-slip rubber feet if mobility is not required.
- Final Tightening: Once all components are in place, re-check and tighten all screws to ensure the rack is stable and secure.
Mufananidzo: Angled view of the fully assembled Sound Town SDRK-ST16T studio rack, showcasing its Golden Oak finish, slanted top section, slide-out tray, and casters.

Image: Detailed diagram showing the dimensions of the SDRK-ST16T studio rack, including overall height, width, depth, and internal rack unit measurements.
Operating Instruction
The SDRK-ST16T rack is designed for efficient organization and access to your audio equipment.
- Mounting Equipment: Use the provided 10/32 rack screws to securely mount your 19-inch rack-mountable equipment into the 8U top and 8U lower sections. The 7.5-degree slant of the top rails improves visibility and access to controls.
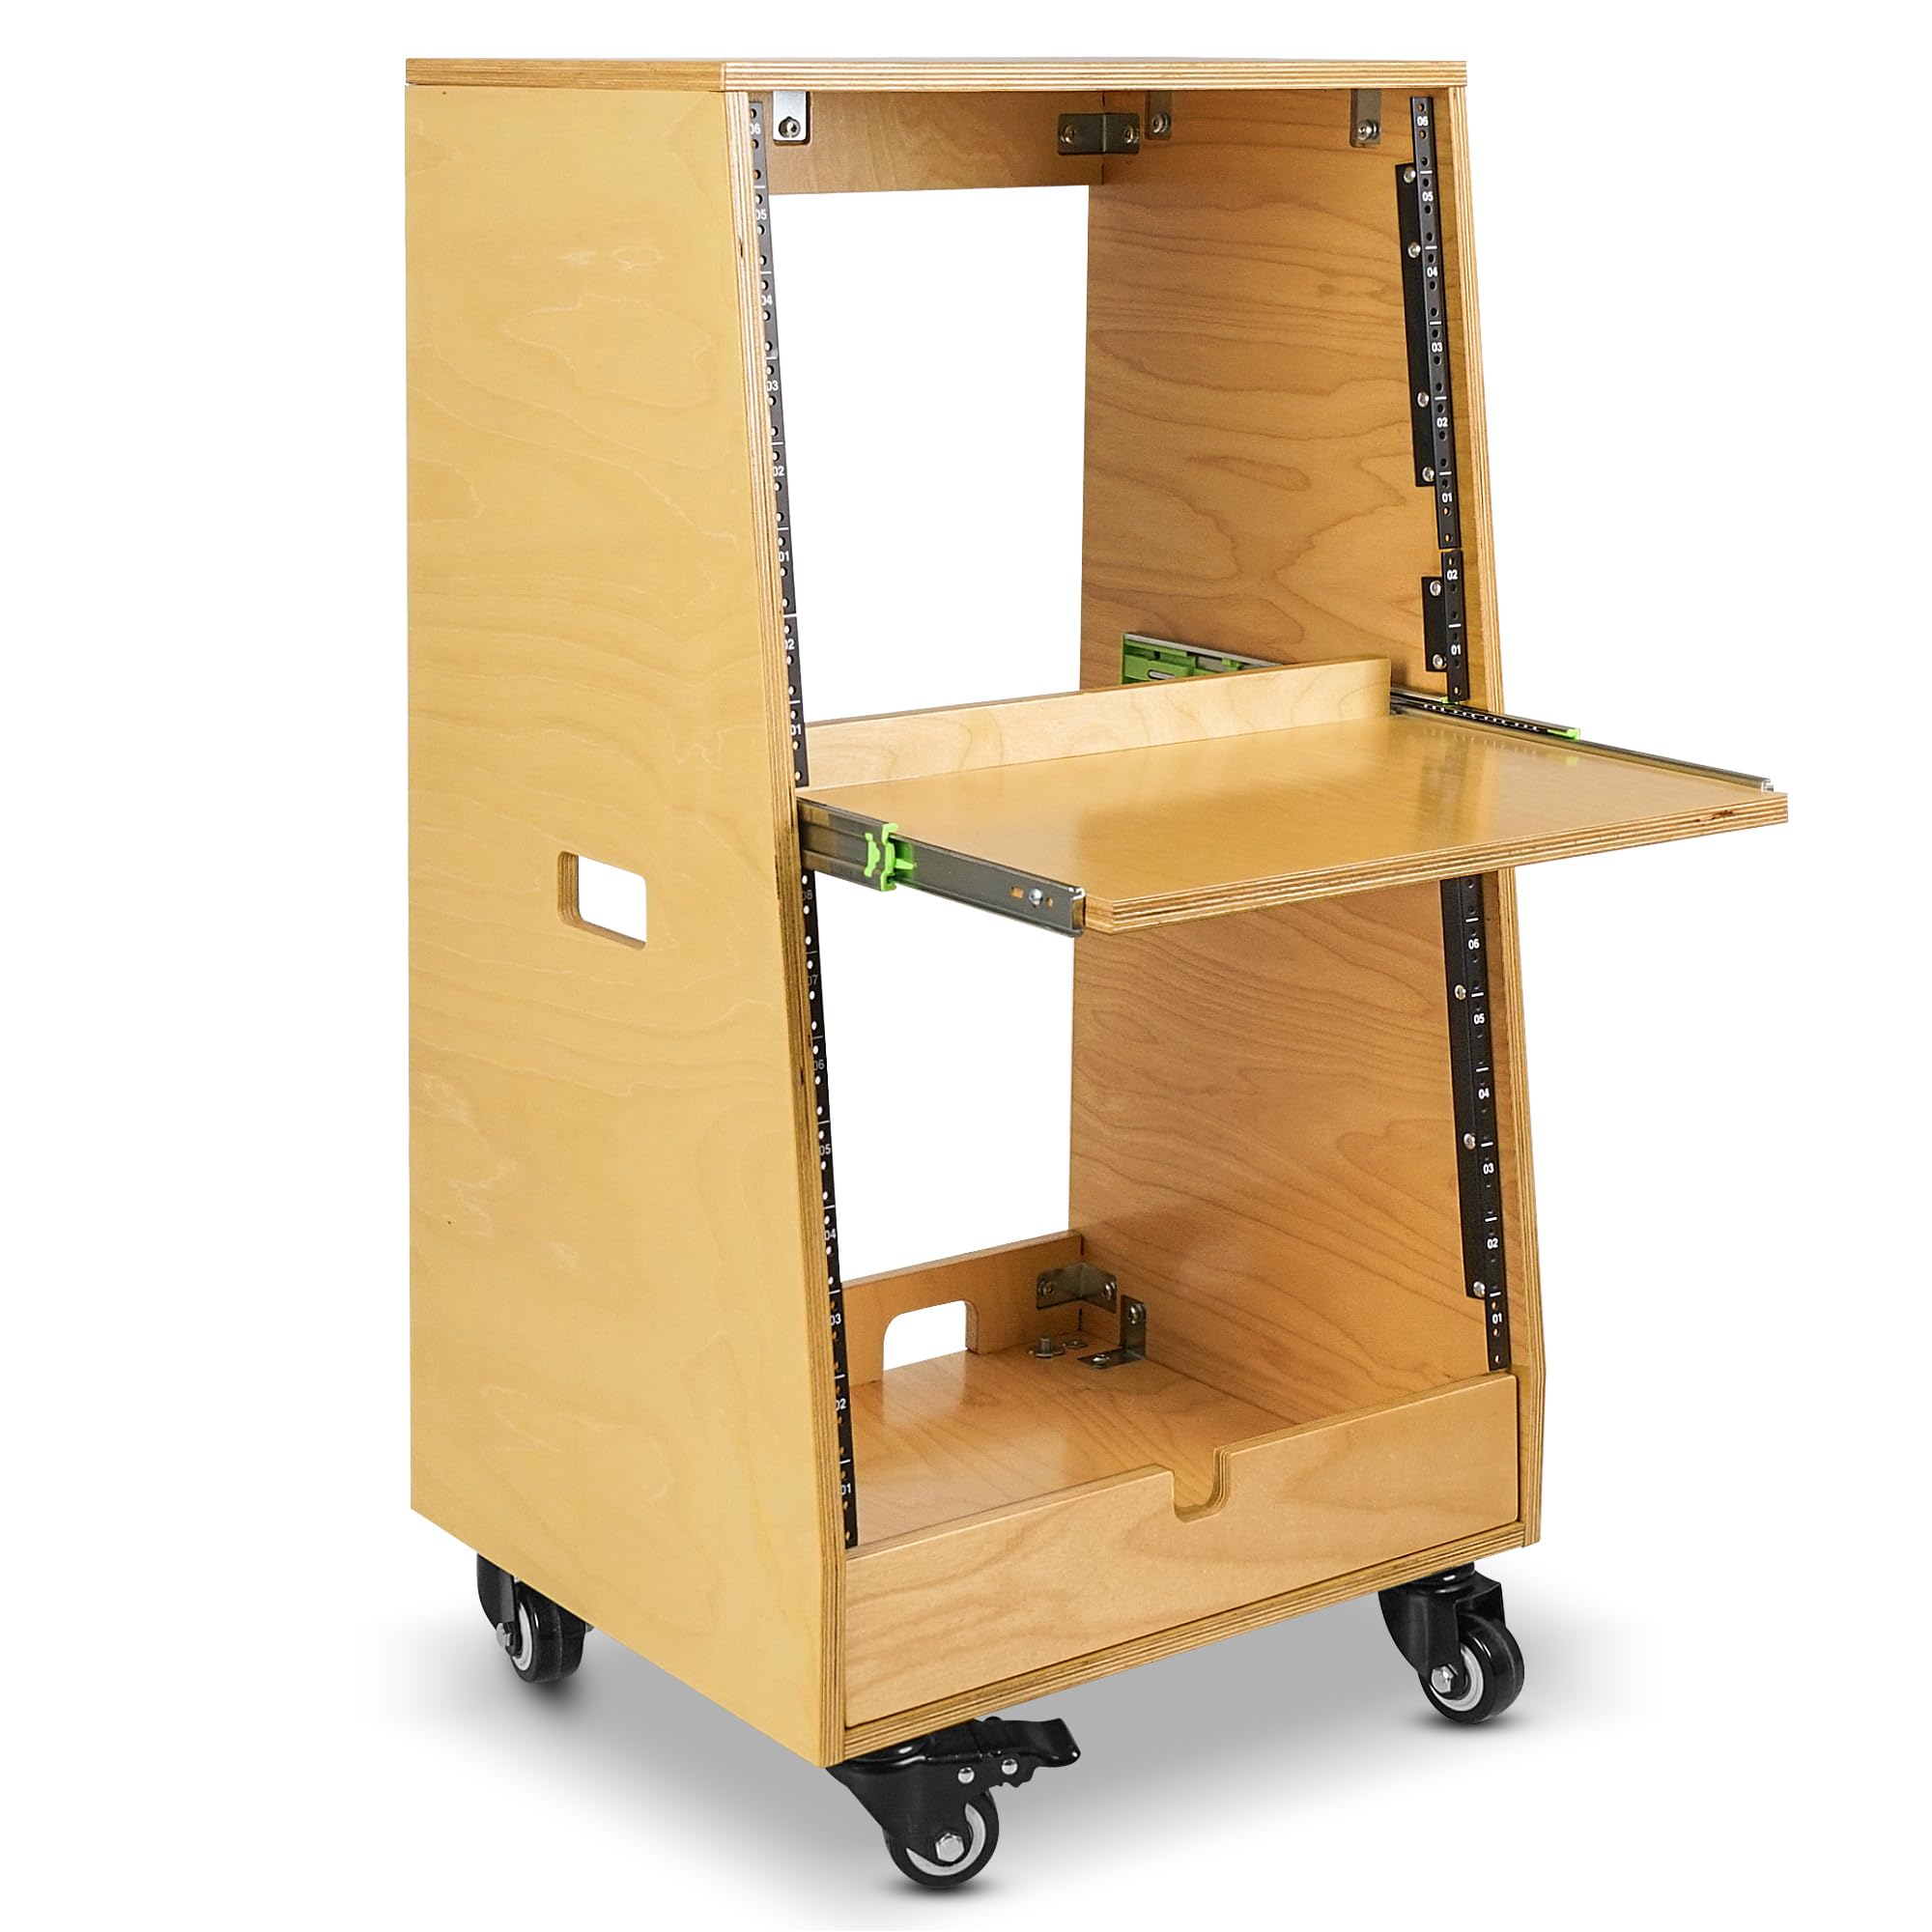
- Using the Slide-Out Tray: The central sliding tray can be pulled out to access frequently used equipment or to provide a temporary workspace. Ensure the tray slides smoothly and is pushed back in when not in use.
- Accessing Bottom Storage: The 2U bottom compartment features a flip-open cover, allowing easy access to store cables, accessories, or smaller non-rack-mountable items.
- Mobility uye Kugadzikana: Unlock the two braked casters to move the rack. Once positioned, engage the lever brakes on the casters to prevent unwanted movement. If using rubber feet, ensure the rack is placed on a level surface.

Mufananidzo: Angled view of the SDRK-ST16T studio rack with its central slide-out tray fully extended, demonstrating its functionality for easy access.
Maintenance
Proper maintenance ensures the longevity and appearance of your studio rack.
- Kuchenesa: Wipe the plywood surfaces with a soft, dry cloth. For stubborn marks, use a slightly damp cloth with a mild wood cleaner, then dry immediately. Avoid abrasive cleaners or harsh chemicals.
- Hardware Check: Periodically inspect all screws and fasteners for tightness. Re-tighten as necessary to maintain structural integrity.
- Caster Care: Keep casters free of debris. If they become stiff, a small amount of silicone lubricant can be applied to the swivel mechanisms.
- Environmental Conditions: Avoid exposing the rack to extreme temperature changes or high humidity, which can affect wood products.
Kugadzirisa matambudziko
If you encounter issues with your SDRK-ST16T studio rack, consider the following:
- Rack Feels Wobbly: Ensure all assembly screws are fully tightened. Check that the rack is placed on a level surface. If using casters, ensure they are securely attached.
- Slide-Out Tray Sticks: Verify that the slide mechanisms are correctly installed and free of obstructions. Ensure no equipment is interfering with the tray's movement. Avoid forcing the tray.
- Equipment Not Fitting: Confirm that your equipment is standard 19-inch rack-mountable. Ensure you are using the correct 10/32 rack screws and that the rack rails are not obstructed.
- Vatambi Vasingafambi Zvakanaka: Check for debris in the caster wheels. Ensure the caster brakes are disengaged.
Zvinotsanangurwa
| Brand | Sound Town |
| Model | SDRK-ST16T |
| Material | Engineered Wood (15mm Plywood) |
| Color | Golden Oak |
| Rack Units | 16U Total (8U Top, 8U Lower) + 2U Bottom Storage |
| Slant Angle | 7.5-degree (Top Rails) |
| Mobility | 4 Casters (2 locking) or Non-slip Rubber Feet |
| Item Weight | 52.1 Pondo |
| Gungano Rinodiwa | Ehe |
| UPC | 810141701670 |
Warranty Information
For detailed warranty information regarding your Sound Town SDRK-ST16T studio rack, please refer to the official Sound Town website or contact their customer service directly. Warranty terms and conditions may vary and are subject to the manufacturer's policy at the time of purchase.
Mutengi Support
Should you require assistance with assembly, operation, or troubleshooting that is not covered in this manual, please contact Sound Town customer support. Contact information, including phone numbers and email addresses, can typically be found on the official Sound Town websaiti (Visit the Sound Town Store).


