1. Nhanganyaya
This manual provides detailed instructions for the installation, operation, and maintenance of your GAMEON Midnight I Series Mid Tower Gaming PC Case. Please read this manual thoroughly before beginning installation to ensure proper setup and to maximize the performance and lifespan of your product. Keep this manual for future reference.
2. Safety Information
- Always disconnect the power supply from the wall outlet before performing any installation or maintenance inside the PC case.
- Handle the tempered glass panels with care. Tempered glass, while durable, can shatter if dropped or subjected to sharp impacts.
- Avoid exposing the case to extreme temperatures or high humidity.
- Do not attempt to modify the case or its components. Unauthorized modifications may void your warranty and pose safety risks.
- Chengeta zvikamu zvidiki nezvikushi kure nevana.
3. Package Zviri mukati
Ndokumbira utarise kuti zvinhu zvese zvakanyorwa pazasi zviripo mupakeji yako:
- GAMEON Midnight I Series Mid Tower Gaming PC Case
- 7 x 120mm ARGB PWM Cooling Fans (pre-installed)
- Accessory Box (containing screws, cable ties, and other mounting hardware)
- ARGB/PWM Fan Controller and Remote Control
- Mushandisi Chinyorwa (gwaro iri)
4. Chigadzirwa Pamusoroview
The GAMEON Midnight I Series PC case is designed for optimal cooling and aesthetic appeal, featuring tempered glass panels and pre-installed ARGB PWM fans.

Figure 4.1: Internal layout of the PC case, highlighting the spacious interior for component installation.

Figure 4.2: Rear and top internal view, illustrating fan placement and overall structure.
4.1 ARGB+PWM Case Fans
The case comes with 7 pre-installed 120mm ARGB PWM fans, providing efficient cooling and customizable lighting. The fans are controlled via an included ARGB/PWM controller and remote.

Figure 4.3: ARGB+PWM fan features and fan mounting support. The front supports 360mm water cooling. Fan mounts include 3x120mm for PSU cover, 3x120mm for bottom, 3x120mm for top, and 1x120mm for rear.
4.2 Mberi I/O Zviteshi
The front panel provides convenient access to essential ports for connectivity.
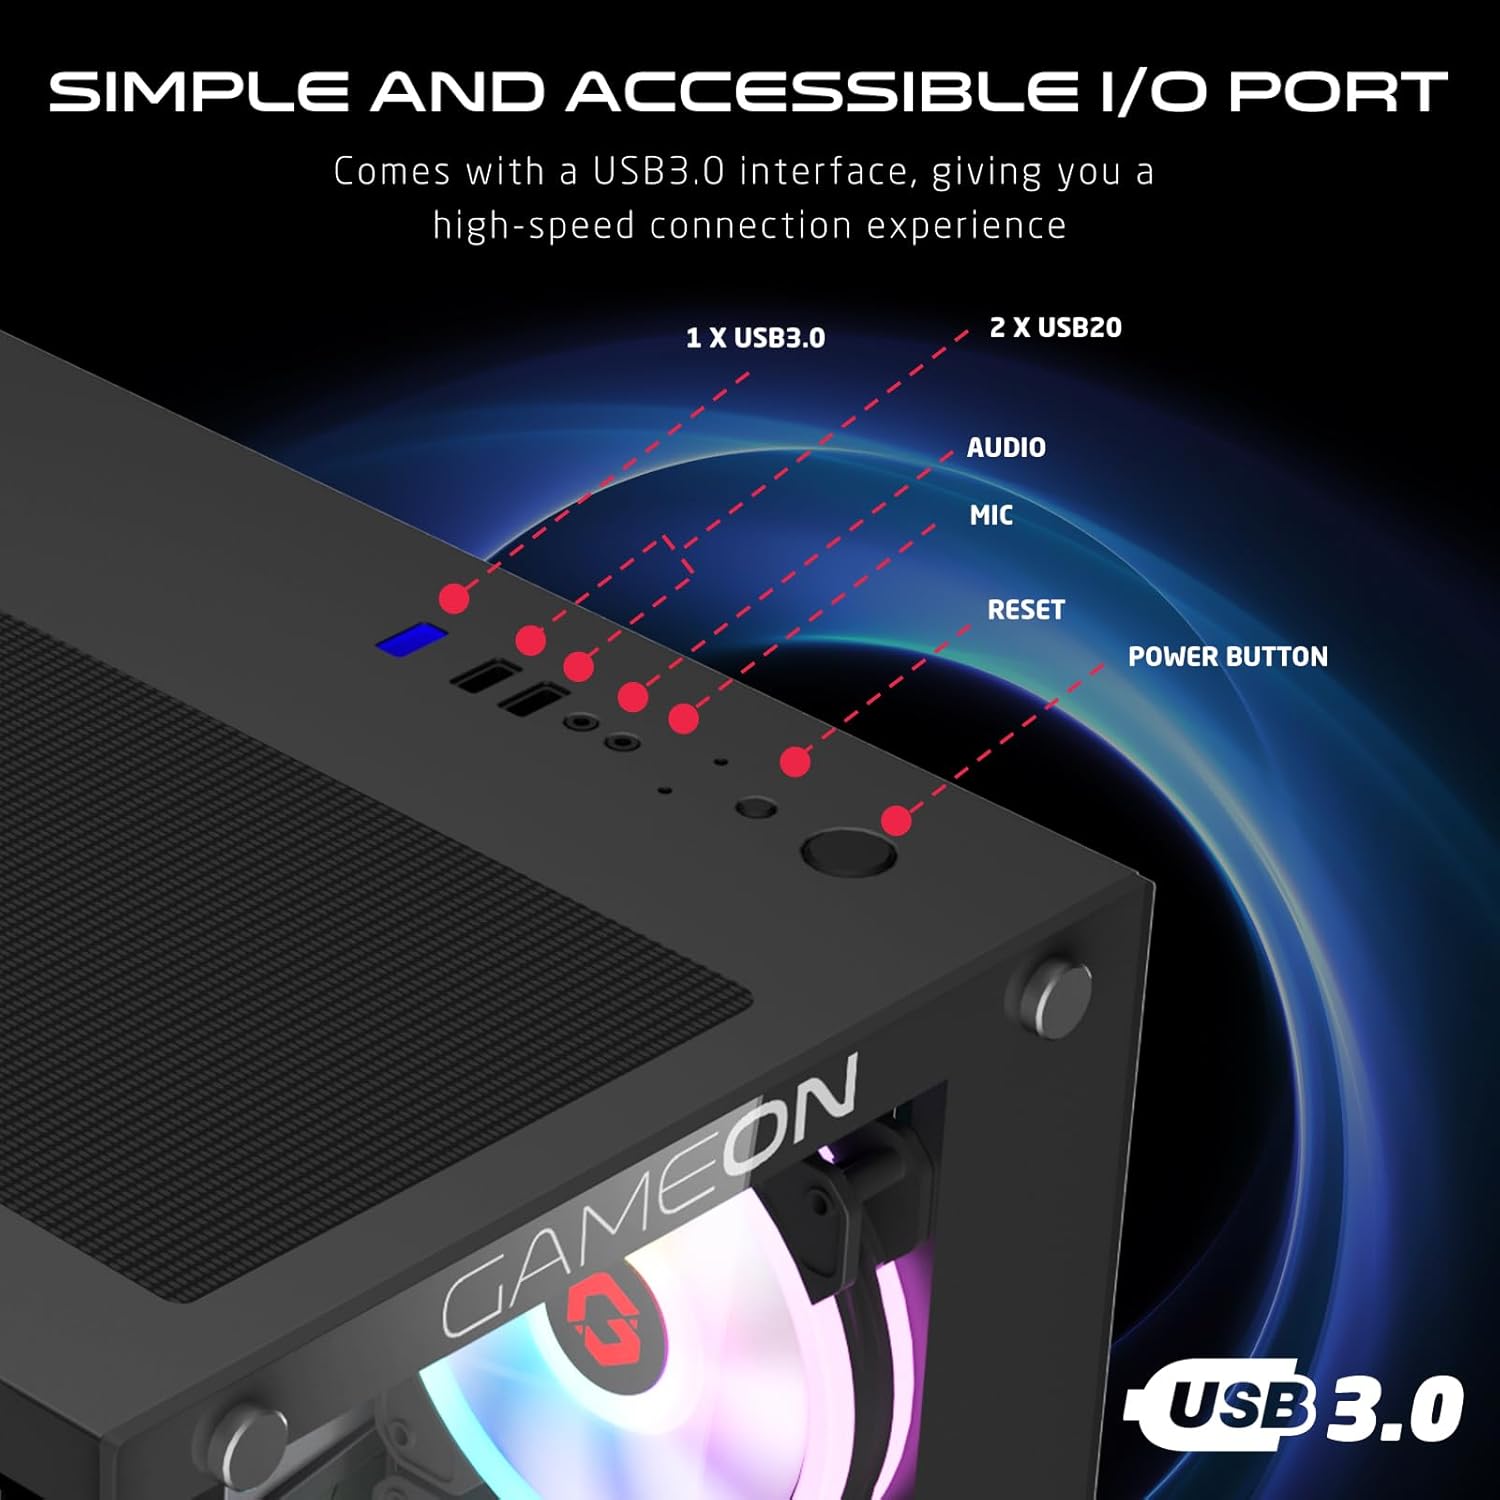
Figure 4.4: Front I/O ports, including 1x USB 3.0, 2x USB 2.0, Audio jack, Microphone jack, Reset button, and Power button.
4.3 Cooling and Construction
The case is designed with an optimized cooling solution, featuring multiple fan mounts and durable tempered glass panels.

Figure 4.5: Optimized cooling solution with massive air intake and exhaust. Features 7 pre-installed fans and durable tempered glass construction.
4.4 Compatibility and Drive Support
The case offers wide compatibility for various motherboard form factors and ample drive bay support.

Figure 4.6: Motherboard compatibility includes ATX, M-ATX, and ITX. Drive bay support for 2x HDD and 2x SSD. Also shown are the front panel header connections.
5. Setup Instructions
Follow these steps to install your components into the GAMEON Midnight I Series PC case.
5.1 Kugadzirira Nyaya
- Isa bhokisi panzvimbo yakati sandara, yakagadzikana.
- Carefully remove the tempered glass side panel(s) by unscrewing the thumb screws and gently sliding the panel off. Set them aside in a safe place.
- Remove any internal packaging materials.
5.2 Kuisirwa mamaboardboard
- Isa shield yeI/O (kana isina kuiswa kare pabhodhi reamai rako) muburi rekumashure rebhokisi.
- Align your motherboard with the standoffs inside the case. Ensure the standoffs match your motherboard's form factor (ATX, M-ATX, ITX).
- Chengetedza motherboard ne screws dzakapihwa.
5.3 Kuisa Simba Chikamu (PSU) Kuisirwa
- Tsvaga nzvimbo yekuisira PSU pasi kumashure kwebhokisi.
- Slide your PSU into position from the rear of the case.
- Secure the PSU with the provided screws.
5.4 Drive Installation (HDD/SSD)
Kesi yacho inotsigira maHDD maviri e3.5" uye maSSD maviri e2.5".
- For 3.5" HDDs: Locate the drive cage, typically near the PSU shroud. Slide the HDD into the drive bay and secure it with screws.
- For 2.5" SSDs: Mount the SSDs to the designated mounting points, usually on the back of the motherboard tray or within the drive cage, using the provided screws.
5.5 Kuisa Kadhi reMifananidzo neKadhi reKuwedzera
- Bvisa zvivharo zvePCIe slot zvinodiwa kubva kumashure kwekesi.
- Insert your graphics card or other expansion cards into the appropriate PCIe slots on your motherboard.
- Simbisa makadhi ne screws.
5.6 Cable Management
Utilize the cable routing cutouts and tie-down points behind the motherboard tray to manage cables. This improves airflow and aesthetics.
5.7 Connecting Front Panel I/O and Fans
- Connect the front panel cables (Power SW, Reset SW, HDD LED, Power LED, USB 3.0, USB 2.0, HD Audio) to their corresponding headers on your motherboard. Refer to your motherboard manual for header locations.
- Ensure the pre-installed ARGB fans are connected to the included ARGB/PWM controller. Connect the controller to a SATA power connector from your PSU and a 3-pin ARGB header (if available) and a 4-pin PWM header on your motherboard for software control, or use the remote for standalone control.
6. Operating Instructions
6.1 Kubatidza/Kudzima
- After all components are installed and cables connected, replace the side panels.
- Connect your monitor, keyboard, mouse, and power cable to the PSU.
- Press the Power button on the front panel to turn on your PC.
- To turn off, use the operating system's shutdown function or press and hold the Power button for several seconds.
6.2 ARGB Fan Control
The pre-installed ARGB fans can be controlled in two ways:
- Remote Control: Use the included remote to cycle through various lighting effects, adjust brightness, and change fan speed.
- Software yeMotherboard: If the ARGB controller is connected to a compatible 3-pin ARGB header on your motherboard, you can synchronize lighting effects with your motherboard's RGB software (e.g., ASUS Aura Sync, MSI Mystic Light Sync, ASRock Polychrome RGB, Gigabyte RGB Fusion).
7. Kuchengeta
Kugadziriswa nguva dzose kunobatsira kuona kuti bhokisi rePC yako rinoshanda zvakanaka uye rinogara kwenguva refu.
7.1 Dust Sefa Yekuchenesa
The case includes dust filters to prevent dust buildup. It is recommended to clean them every 1-3 months, depending on your environment.
- Locate the dust filters (e.g., top, bottom, front).
- Bvisa zvinyoro nyoro mafirita.
- Clean them using compressed air, a soft brush, or by rinsing with water (ensure they are completely dry before re-installing).
- Re-attach the dust filters.
7.2 General Kuchenesa
- Shandisa nyoro, damp cloth to wipe down the exterior surfaces of the case. Avoid abrasive cleaners.
- For tempered glass panels, use a glass cleaner and a microfiber cloth to avoid streaks.
7.3 Fan Cleaning
Periodically inspect the fan blades for dust accumulation. Use compressed air to gently clear dust from the fan blades and grilles.
8. Kugadzirisa matambudziko
If you encounter issues with your PC case, refer to the following common problems and solutions.
8.1 Fans Not Spinning or ARGB Not Working
- Tarisa Power Connection: Ensure the ARGB/PWM controller is properly connected to a SATA power connector from your PSU.
- Check Fan Connections: Verify that all fans are securely connected to the ARGB/PWM controller.
- Remote Control Battery: If using the remote, check if its battery needs replacement.
- Software yeMotherboard: If using motherboard software for control, ensure the controller is connected to the correct ARGB header and the software is installed and configured correctly.
- Fan Direction: Ensure fans are oriented correctly for optimal airflow (intake/exhaust).
8.2 Front I/O Ports Not Functioning
- Check Motherboard Connections: Ensure all front panel cables (USB 3.0, USB 2.0, HD Audio) are correctly and securely connected to their respective headers on the motherboard. Refer to your motherboard manual.
8.3 PC Isina Kubatidzwa
- Power Button Connection: Verify the Power SW cable from the front panel is correctly connected to the motherboard's front panel header.
- PSU Connection: Ensure the PSU is properly connected to the wall outlet and the power switch on the PSU is in the 'ON' position.
- Internal Power Cables: Check that all necessary power cables (24-pin ATX, CPU, GPU) are securely connected to the motherboard and components.
9. Zvinotsanangurwa
| Feature | Tsanangudzo |
|---|---|
| Model Name | GO-EMPERORII-M (Midnight I Series) |
| Nyaya Type | Mid tower |
| Material | Tempered Glass |
| Color | Nhema |
| Zviyero zveChigadzirwa (L x W x H) | 44 x 28 x 42.7 cm |
| Item Weight | 6.45 kg |
| Motherboard Support | ATX, Micro ATX, ITX |
| Pre-yakaiswa Fans | 7 x 120mm ARGB PWM Fans |
| Fan Size | 120mm |
| Kutonhodza Nzira | Air, Water (supports up to 360mm radiator in front) |
| Drive Bays | 2 x 3.5" HDD, 2 x 2.5" SSD |
| Kumberi I / O Zviteshi | 1 x USB 3.0, 2 x USB 2.0, Audio, Mic, Reset, Power |
| Zvimwe Zvimiro | Dust Filters, ARGB Controller with Remote |
10. Warranty uye Tsigiro
This product comes with a standard manufacturer's warranty. For specific warranty terms and conditions, please refer to the documentation provided with your purchase or contact GAMEON customer support. For technical assistance or further inquiries, please visit the official GAMEON websaiti kana kubata nzira dzavo dzekutsigira.


