1. Nhanganyaya
Thank you for choosing the Vormooi Digital Voice Recorder. This device is designed for high-quality audio recording, offering features such as ultra-long continuous recording, voice activation, and versatile input options. With its substantial 96GB memory capacity and advanced noise reduction technology, it is an ideal tool for lectures, interviews, meetings, and personal notes. This manual provides detailed instructions to help you set up, operate, and maintain your device for optimal performance.
2. Package Zviri mukati
Ndokumbira utarise bhokisi rezvinhu zvinotevera:
- 1 x Vormooi Digital Voice Recorder (32GB built-in memory)
- Kadhi reTF re1 x 64GB (rakaiswa kare kana rakasiyana)
- 1 x 3.5mm External Microphone
- 1 x 3.5mm Line-in Cable
- 1 x USB C Cable
- 1 x Chinyorwa cheMushandisi
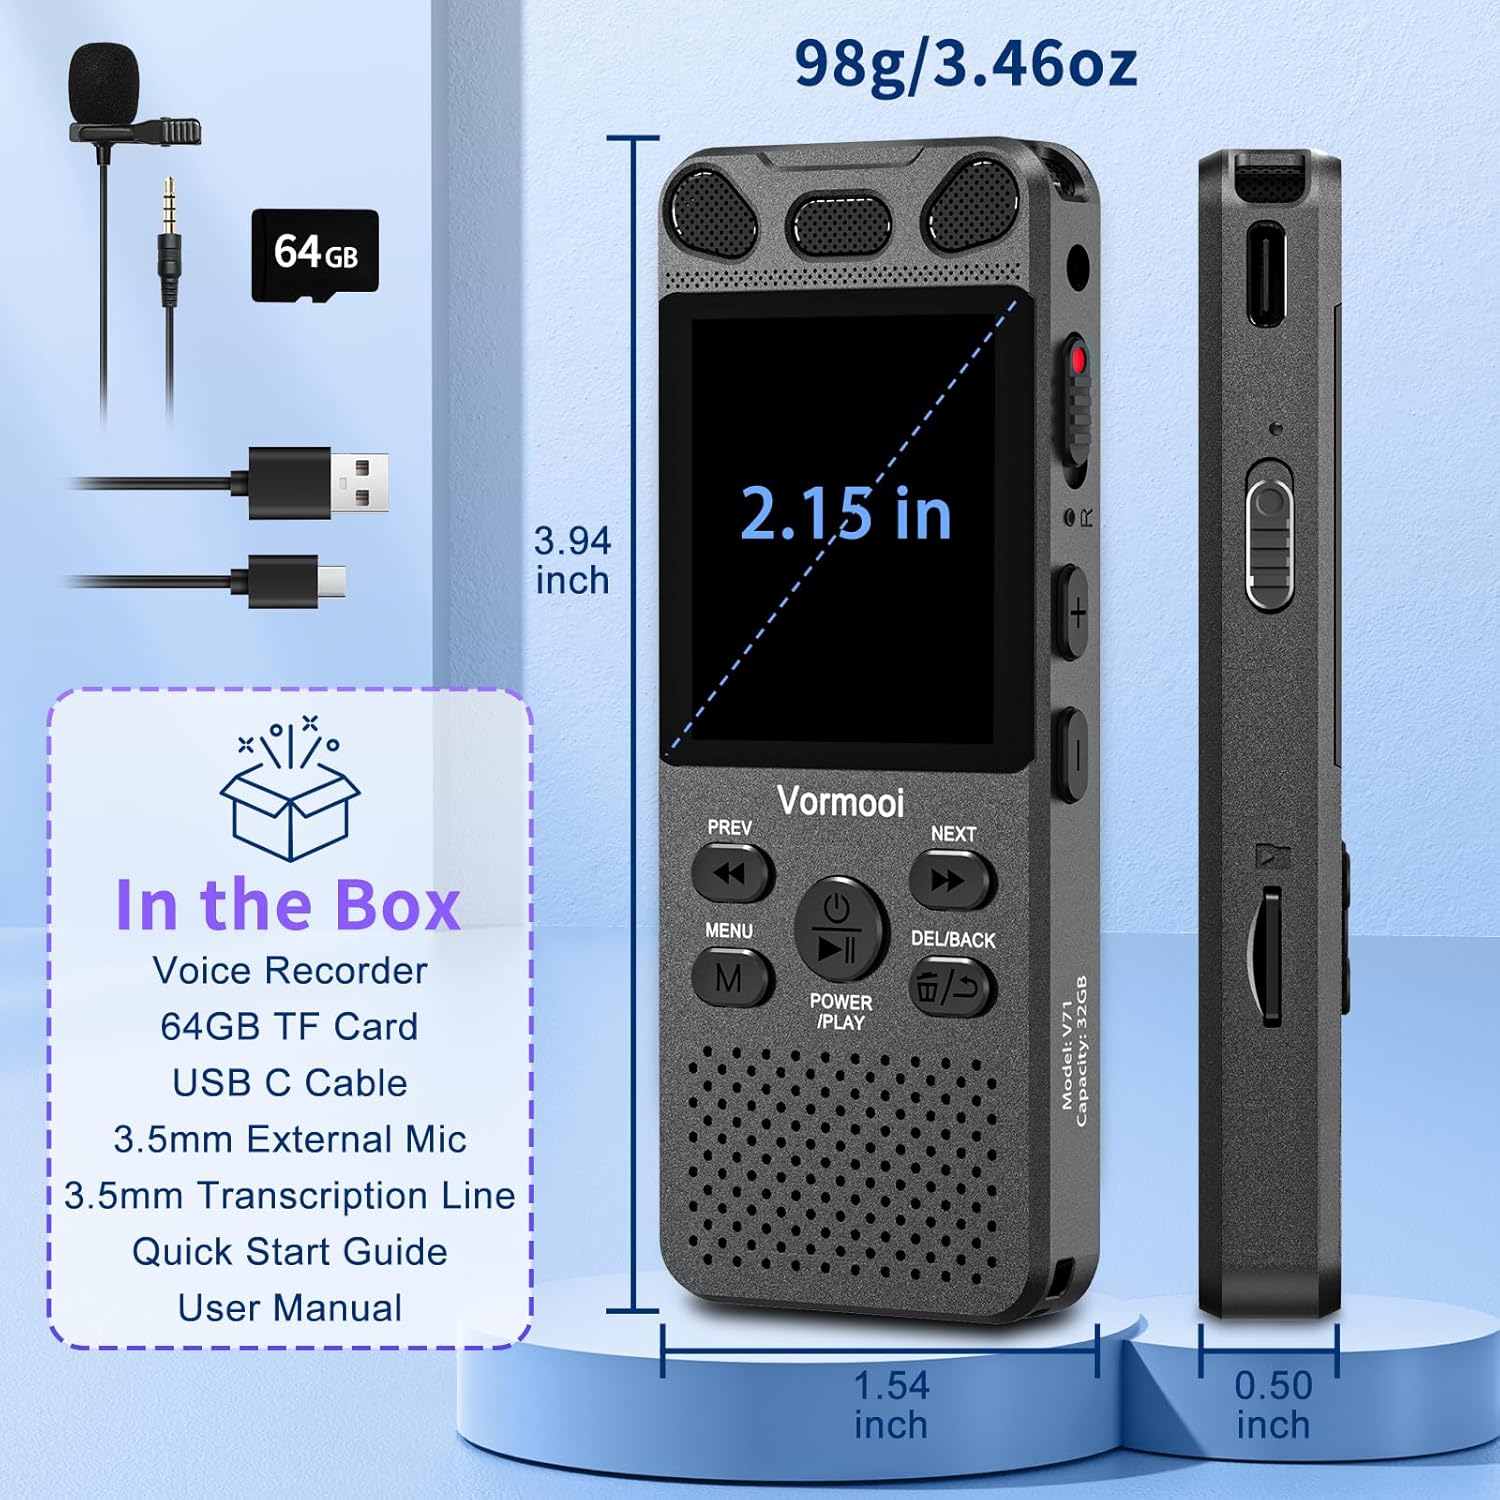
Image: The Vormooi Digital Voice Recorder and its included accessories, such as the external microphone, USB-C cable, and 64GB TF card.
3. Chigadzirwa Pamusoroview
Familiarize yourself with the various parts and controls of your Vormooi Digital Voice Recorder.

Image: Labeled diagram of the Vormooi Digital Voice Recorder highlighting its USB C Port, Lock/Unlock switch, Previous Song/Fast Rewind button, TF-Card Slot, Menu button, Power/Play/Pause/OK button, 3.5mm Jack, Record/Save (REC) switch, Reset button, Volume +/- buttons, Next Song/Fast Forward button, and Back/Delete Files bhatani.
Zvikamu Zvikuru:
- Ratidza Sikirini: 2.15-inch color screen for navigation and information display.
- Built-in Microphones: For omni-directional recording.
- Mutauri For playback of recordings.
- REC Switch: Slide up to start recording, slide down to save.
- LOCK Bhatani: Locks all buttons to prevent accidental operation during recording.
- USB-C Chiteshi: Yekuchaja nekubatanidza pakombuta.
- 3.5mm Jack: For connecting external microphone or headphones.
- TF-Card Slot: For inserting the 64GB TF card to expand memory.
4. Setup
4.1 Kuchaja Chishandiso
Before first use, fully charge the voice recorder.
- Connect the provided USB-C cable to the recorder's USB-C port.
- Batanidza imwe magumo e USB-C tambo kune USB magetsi adapta (isina kuisirwa) kana komputa USB port.
- The battery icon on the screen will indicate charging status. A full charge takes approximately 2 hours.
Cherechedza: A fully charged battery provides up to 110 hours of continuous recording.
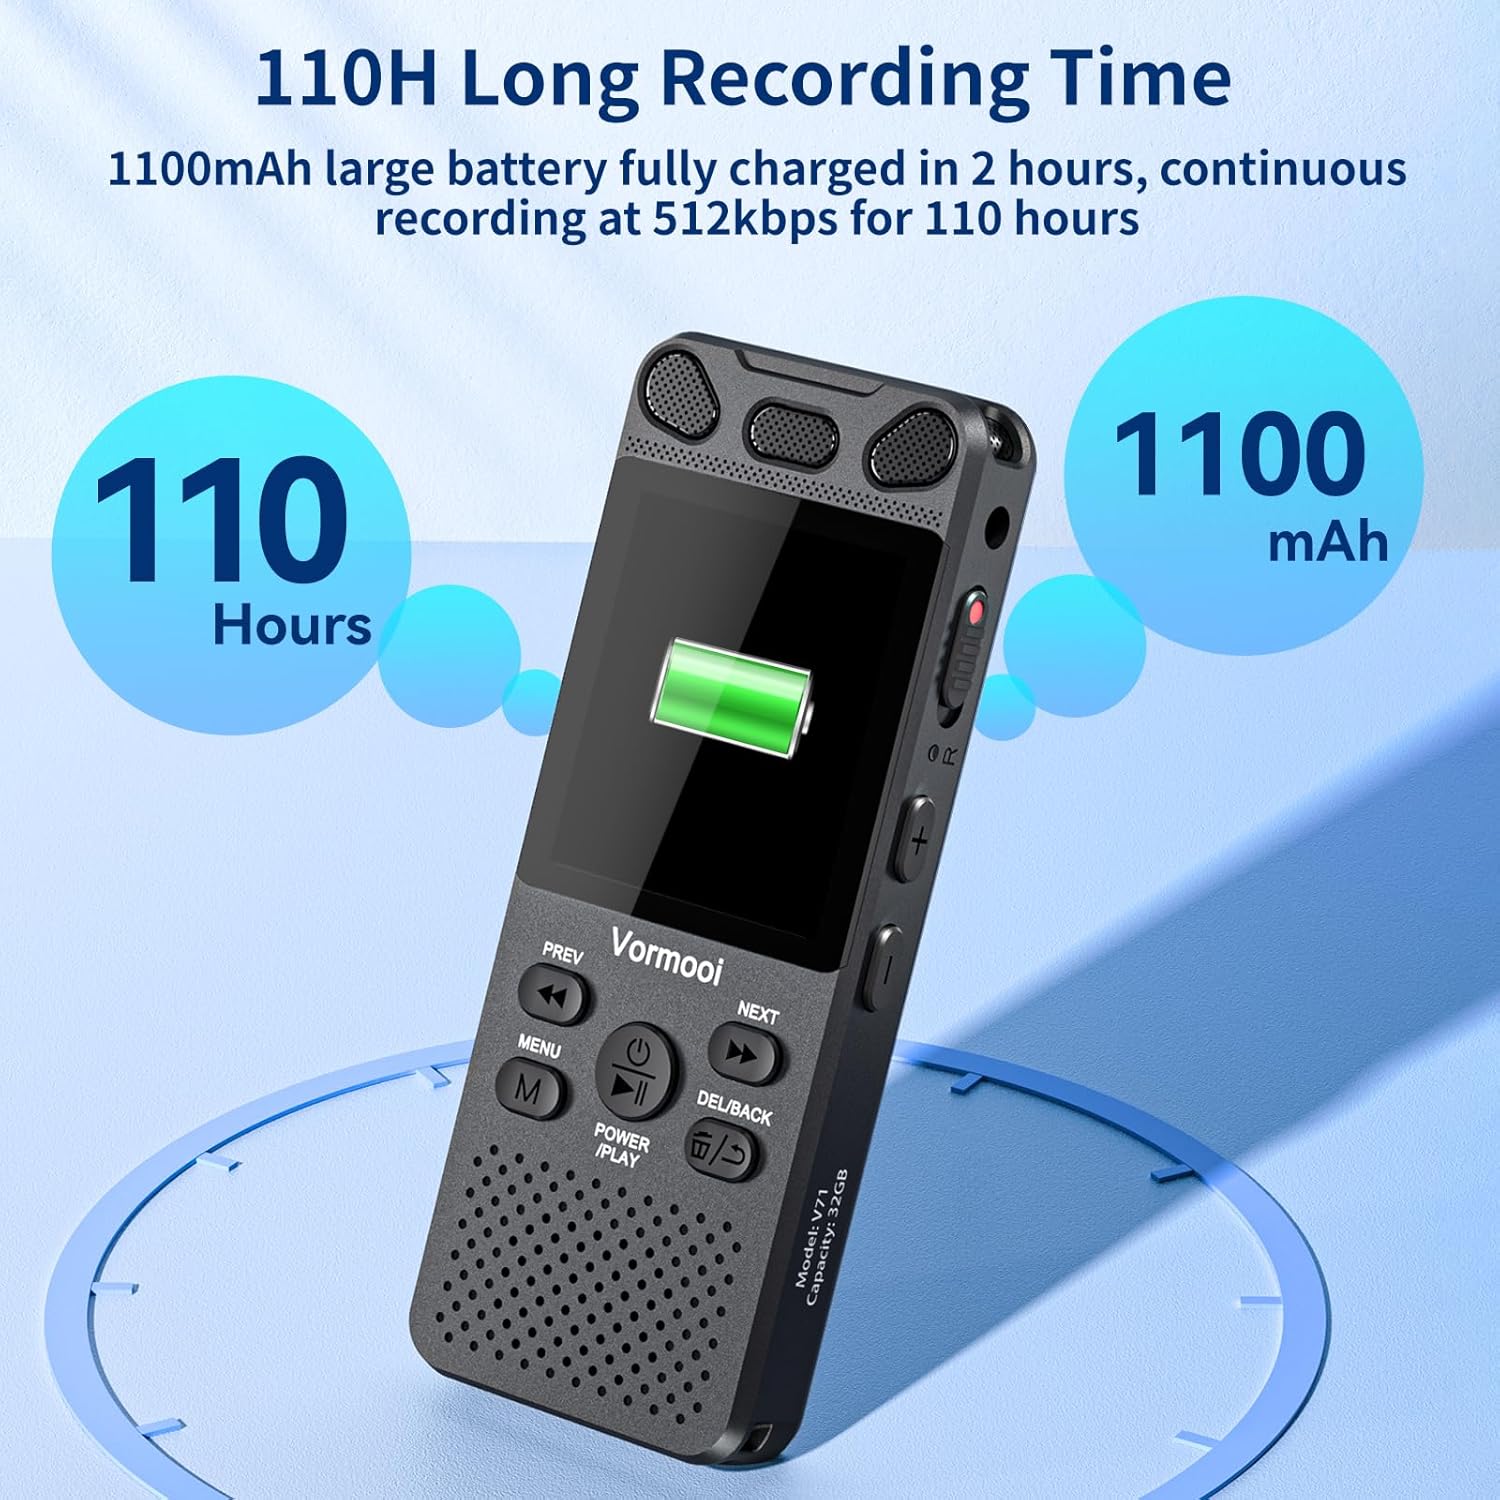
Image: The recorder's screen displaying battery status and highlighting its 110-hour long recording capability and 1100mAh battery.
4.2 Kuisa Kadhi reTF
The device comes with 32GB built-in memory and an additional 64GB TF card for expanded storage.
- Locate the TF-Card Slot on the side of the recorder.
- Gently insert the 64GB TF card into the slot until it clicks into place. Ensure the card is oriented correctly.
- To remove, push the card gently inward until it springs out.

Image: Visual representation of the recorder's 96GB storage, composed of 32GB internal memory and an expandable 64GB TF card, capable of storing over 7000 hours of 32kbps recordings.
4.3 Kubatidza/Kudzima
- Power On: Dzvanya uye ubate iyo POWER/PLAY/PAUSE/OK button for a few seconds until the screen lights up.
- Power Off: Dzvanya uye ubate iyo POWER/PLAY/PAUSE/OK bhatani kusvika skrini yadzima.
5. Operating Instructions
5.1 Yekutanga Kurekodha
The Vormooi recorder features a convenient one-touch recording function.
- To start recording, slide the REC switch upwards. The recording indicator will light up, and the screen will show recording in progress.
- To save the recording, slide the REC switch downwards. The recording will be saved automatically.

Image: The recorder's one-touch record/save switch, demonstrating its ease of use, alongside icons representing 1536K clear sound quality and an intelligent noise cancellation chip.
5.2 Kutamba
- From the main menu, navigate to "Recordings Library" or "Folders".
- Shandisa iyo PREV uye ZVINOTEVERA mabhatani ekusarudza rekodhi yaunoda.
- Press the POWER/PLAY/PAUSE/OK bhatani kutanga kutamba.
- Panguva yekutamba, dzvanya POWER/PLAY/PAUSE/OK to pause/resume.
- Shandisa iyo PREV uye ZVINOTEVERA buttons for fast rewind/fast forward.
- Chinja vhoriyamu uchishandisa iyo Vhoriyamu +/- mabhatani.
5.3 Voice Activated Recording (VAR)
The VAR function allows the recorder to start recording automatically when sound is detected and pause when silence occurs, saving memory space.
- Go to the "Settings" menu.
- Select "VAR Mode" or "Voice Activated".
- Choose your desired sensitivity level (e.g., Level 1-7, where 7 is most sensitive).
- Exit the menu. The recorder will now record only when sound is present.

Image: A composite image illustrating key functionalities: Voice Activated Recording, 110-hour battery life, password protection, A-B repeat for specific section playback, and variable speed playback.
5.4 External Microphone Recording
For more precise audio capture, especially in interviews, use the included external microphone.
- Plug the 3.5mm jack of the external microphone into the recorder's 3.5mm jack.
- Ensure the microphone is positioned correctly for optimal sound pickup.
- Proceed with recording as usual using the REC switch. The device will automatically switch to external microphone input.

Image: The Vormooi recorder connected to its external 3.5mm microphone, showing the setup for enhanced audio recording.
5.5 Line-in Recording (Transcription)
The line-in function allows you to record audio directly from other devices like cell phones, MP3 players, or computers.
- Connect one end of the 3.5mm Line-in Cable to the audio output of your external device (e.g., headphone jack of a phone).
- Connect the other end of the 3.5mm Line-in Cable to the recorder's 3.5mm jack.
- Start playback on your external device and then slide the REC switch upwards on the recorder to begin recording.

Image: Setup for line-in recording, showing the recorder connected to a smartphone via a 3.5mm cable, enabling direct audio capture from other devices.
5.6 Kuderedza ruzha
The Vormooi recorder is equipped with an advanced noise reduction chip and adjustable noise reduction levels (7 levels).
- Access the "Settings" menu.
- Find the "Noise Reduction" or "DSP" option.
- Adjust the level to minimize environmental noise during recording. Higher levels provide more aggressive noise reduction.

Mufananidzo: Yemukati view highlighting the 2159 Intelligent Noise Reduction Chip (DSP) responsible for minimizing environmental noise and enhancing audio clarity.
5.7 Lock Bhatani
To prevent accidental interruption or loss of recording due to unintentional button presses, use the LOCK button.
- Slide the LOCK button (usually on the side) to the "locked" position. All buttons will become unresponsive.
- Slide it back to the "unlocked" position to regain control of the buttons.

Image: The lock switch on the side of the recorder, showing its "UP: Locked" and "DOWN: Unlock" positions, designed to prevent accidental button presses during recording.
5.8 Kubatanidza kuKombuta
You can transfer recordings to your Windows or macOS computer.
- Connect the recorder to your computer using the provided USB-C cable.
- The recorder will appear as a removable disk drive on your computer.
- You can then drag and drop audio files kuenda uye kubva mudziyo.
6. Kuchengeta
- Kuchenesa: Shandisa jira rakapfava, rakaoma kuchenesa mudziyo. Usashandise zvinochenesa mvura kana zvinonyungudutsa.
- Kuchengeta: Chengetedza mudziyo munzvimbo inotonhorera, yakaoma kure nechiedza chezuva uye tembiricha yakanyanyisa.
- Battery Care: Kuti bhatiri rirambe richirarama kwenguva refu, dzivisa kuburitsa bhatiri rakazara nguva nenguva. Richaje nguva dzose, kunyangwe risingashandiswe kwenguva yakareba.
- Data Backup: Regularly back up important recordings to your computer to prevent data loss.
7. Kugadzirisa matambudziko
| Dambudziko | Possible Solution |
|---|---|
| Mudziyo haubatike. |
|
| Haikwanise kurekodha. |
|
| Hunhu husina kunaka hwekurekodha. |
|
| Mudziyo hauzivikanwe nekombuta. |
|
8. Zvinotsanangurwa
| Feature | Detail |
|---|---|
| Model Number | O1 |
| Memory Capacity | 96 GB (32GB Built-in + 64GB TF Card) |
| Kurekodha Hunhu | Up to 1536Kbps HD |
| Hupenyu hwebhatiri | Up to 110 hours continuous recording |
| Screen Size | 2.15 inches |
| Product Dimensions | 1.54"D x 3.94"W x 4.96"H |
| Item Weight | 5.3 ounces |
| Maheadphone Jack | 3.5 millimeters |
| Anotsigirwa Formats | MP3 Audio, WAV (also FLAC, OGG, APE, WMA for playback, as per A+ content image) |
| Hardware inowanikwa | USB Type C |
| Inowirirana Devices | Windows/macOS Computer |
9. Mutengi Tsigiro
For any questions, issues, or assistance with your Vormooi Digital Voice Recorder, please contact our support team.
- Support Response: Vormooi support team will promptly respond and solve the problem within 24 hours on weekdays.
- Please refer to the contact information provided on the product packaging or the official Vormooi websaiti yeakanyanya-kusvika-zuva ekutsigira nzira.


