1. Nhanganyaya
This manual provides detailed instructions for the installation, operation, and maintenance of your Xigmatek Aqua V AIR Arctic Mid-Tower PC Case. Please read this manual thoroughly before beginning any installation to ensure proper setup and safe operation. Retain this manual for future reference.
2. Safety Information
Chengeta matanho ekuchengetedza anotevera panguva yekuisa nekushanda:
- Gara uchidzima magetsi kubva pamadziro epamadziro usati waisa kana kubvisa chero zvikamu.
- Pfeka tambo inorwisa-static wrist kudzivirira kukuvadzwa kweelectrostatic discharge (ESD) kune zvinosiririsa.
- Handle components carefully. Avoid touching pins or circuit boards directly.
- Iva nechokwadi chekuti mhepo inofefetera zvakanaka paPC kuti isanyanya kupisa.
- Chengetedza zvidimbu zvidiki nemidziyo kure nevana.
- Usaedza kugadzirisa bhokisi racho kana zvikamu zvaro, sezvo izvi zvingaita kuti garandi yako isashande uye zvingakonzera njodzi dzekuchengetedza.
3. Package Zviri mukati
Tarisa uone kuti zvinhu zvese zviripo mupakeji:
- Xigmatek Aqua V AIR Arctic Mid-Tower PC Case
- Accessory kit (screws, standoffs, cable ties)
- Mushandisi Chinyorwa (gwaro iri)
If any items are missing or damaged, contact your retailer or Xigmatek support.
4. Chigadzirwa Pamusoroview
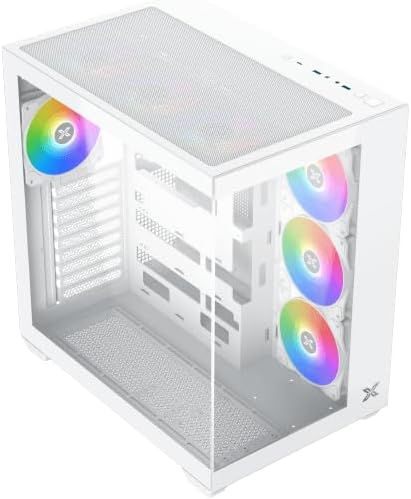
The Xigmatek Aqua V AIR Arctic is a mid-tower PC case designed for high-performance gaming configurations. It features tempered glass panels for component visibility and optimized airflow with pre-installed ARGB fans.

Mufananidzo 4.1: Mberi-kuruboshwe view of the Xigmatek Aqua V AIR Arctic PC case, showcasing the tempered glass front and side panels, and the pre-installed ARGB fans.

Mufananidzo 4.2: Kumashure view of the PC case, showing the I/O shield cutout, expansion slots, and rear fan mount.
Mufananidzo 4.3: Yakakombama kubva kumusoro kusvika pasi view, highlighting the top mesh panel for additional cooling and the internal layout.
5. Setup uye Kuiswa
Follow these steps to install your PC components into the Xigmatek Aqua V AIR Arctic case.
5.1. Kugadzirira Nyaya
- Isa bhokisi panzvimbo yakati sandara, yakagadzikana.
- Remove the tempered glass side panel by unscrewing the thumb screws at the rear and carefully sliding it off. Place it on a soft, non-abrasive surface to prevent scratches.
- Remove the opposite steel side panel by unscrewing the thumb screws and sliding it off.
5.2. Motherboard Installation
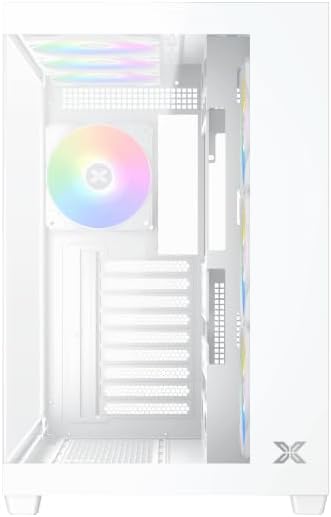
Mufananidzo 5.1: Mukati view of the case, illustrating the motherboard mounting area and cable routing cutouts.
- Install the I/O shield into the cutout at the rear of the case.
- Align your motherboard with the pre-installed standoffs. Ensure the standoffs match your motherboard's form factor (ATX, Micro ATX).
- Secure the motherboard using the provided screws from the accessory kit. Do not overtighten.
5.3. Kuiswa kweChigadziko cheMagetsi (PSU)
- Locate the PSU mounting bracket at the bottom rear of the case.
- Slide your PSU into the designated compartment from the rear of the case.
- Secure the PSU to the case using the screws provided with your power supply.
5.4. Kuisa Dhiraivha Yekuchengetera Zvinhu
The case supports multiple storage drives:
- MaSSD e2.5": Mount directly to the SSD trays located behind the motherboard tray. Secure with screws.
- MaHDD e3.5": Install into the drive cage located beneath the PSU shroud. Slide the drive into the tray and secure with screws.
5.5. Graphics Card (GPU) and Expansion Card Installation
- Bvisa zvivharo zvekuwedzera zvinodiwa zviri kumashure kwekesi.
- Isa kadhi rako remifananidzo kana mamwe makadhi ekuwedzera munzvimbo dzakakodzera dzePCIe dziri pabhodhi reamai.
- Secure the cards with the provided screws.
5.6. Cable Management

Mufananidzo 5.2: View behind the motherboard tray, illustrating the ample space and tie-down points for effective cable management.
Shandisa ma cutouts ekufambisa tambo uye nzvimbo dzekusunga tambo dziri kuseri kwetireyi yemotherboard kuronga tambo. Izvi zvinovandudza kufamba kwemhepo uye runako.
- Connect all necessary power cables from the PSU to the motherboard, GPU, and storage drives.
- Connect front panel cables (USB, audio, power/reset switches, LED indicators) to the corresponding headers on your motherboard. Refer to your motherboard manual for specific header locations.
- Connect the ARGB fan cables to the integrated fan controller or directly to your motherboard's ARGB headers if available.
5.7. Rutsigiro rwefeni neredhiyeta
The Xigmatek Aqua V AIR Arctic comes with 7 pre-installed 120mm ARGB fans. Additional cooling options are available:
- Pamberi Supports up to 3 x 120mm or 2 x 140mm fans / 240mm, 280mm, 360mm radiators.
- Pamusoro: Supports up to 3 x 120mm or 2 x 140mm fans / 240mm, 280mm, 360mm radiators.
- Kumashure: Supports 1 x 120mm fan.
- Pazasi: Inotsigira mafeni anosvika 3 x 120mm.
Ensure proper fan orientation for optimal airflow (intake at front/bottom, exhaust at rear/top).
6. Kushanda
Once all components are installed and cables are connected, replace the side panels. Connect your monitor, keyboard, mouse, and power cable. Press the power button on the front panel to start your system.
The pre-installed ARGB fans can be controlled via the integrated controller (if present) or through compatible motherboard software, allowing customization of lighting effects and fan speeds.
7. Kuchengeta
Kugaro gadzirisa kunobatsira kuve nechokwadi chekuita kwakaringana uye hupenyu hurefu hwezvinhu zvePC yako.
- Kuchenesa Hupfu: Periodically clean dust filters (top, front, bottom) to maintain good airflow. Use compressed air to remove dust from inside the case and components.
- Kucheneswa Kwekunze: Pukuta nzvimbo dzekunze nekanyoro, damp jira. Dzivisa abrasive cleaners kana solvents.
- Kuongorora Kutarisirwa kweCable: Occasionally check cable routing to ensure no cables are obstructing fans or airflow.
8. Kugadzirisa matambudziko
Kana ukasangana nematambudziko, tarisa kune anotevera akajairika matanho ekugadzirisa dambudziko:
- Sisitimu haisi kushanda:
- Ensure the PSU is switched on and properly connected to the wall outlet.
- Verify all power cables (24-pin ATX, 8-pin CPU, PCIe, SATA) are securely connected.
- Tarisa kubatana kwepower switch pabhodhi repamberi nebhodhibhodhi reamai.
- Hapana zvinobuda pakuratidza:
- Ensure the monitor cable is connected to the graphics card (not the motherboard I/O if using a dedicated GPU).
- Dzorerazve kadhi yemifananidzo uye RAM modules.
- Fans not spinning or ARGB not working:
- Tarisa kubatana kwesimba refeni nebhodhibhodhi reamai kana chinodzora feni.
- Verify ARGB connections to the controller or motherboard headers.
- Ensure any fan control software or BIOS settings are correctly configured.
For more complex issues, consult your component manuals or contact Xigmatek technical support.
9. Zvinotsanangurwa
| Feature | Detail |
|---|---|
| Model Name | Aqua V AIR Arctic |
| Model Number | EN45837 |
| Nyaya Type | Mid-Tower |
| Motherboard Kuenderana | ATX, Micro ATX |
| Material | Steel Alloy, Tempered Glass |
| Color | Chena |
| Pre-yakaiswa Fans | 7 x 120mm ARGB Fans |
| Kureba kweMax GPU | 410 mm |
| USB Ports | 3 |
| Kurema | 8.8 makirogiramu |
10. Warranty uye Tsigiro
Xigmatek products are manufactured to high quality standards. For warranty information, please refer to the warranty card included with your product or visit the official Xigmatek website. For technical support or inquiries, please contact Xigmatek customer service through their official channels.
Official Websaiti: www.xigmatek.com


